Little stories about an Android application architecture
![]()
By writing this paper, my goal is to describe how I came up with the Android app architecture I suggest. It’s a step by step writing to follow the reasons bringing me to set up the different components I chose.
The aim of the template application is very simple: it’s a master/detail application to present a list of GitHub repositories of a given user. Although it’s simple, it gathers some classical jobs when writing an application:
- consume a REST API
- save data to a local storage
- load data from this local storage
- architecture the logical layer and navigation between screens
Let’s discover what’s hiding under the hood!
Consuming REST API
REST Client
Retrofit is a well-known library that comes back frequently when developers list “must-have libraries” for Android development.
I’m going to explain why I consider it’s a must-have library:
- it’s type-safe
- the interface to write is human-readable, and annotations with path inside provide a useful mirror of the API
- it provides a complete abstraction layer of how it works under the hood
- it supports multipart request body (useful when you want to upload a file)
- header management directly inside the interface using annotations
- ability to use several serialization types (JSON, XML, protobuf, etc.) thanks to converters
- possibility to add a global request interceptor (to set an authentication header with complex computation for each request for example)
- it is easy to mock when testing
It’s simple to add to a project through the following instruction in the build.gradle file:
compile 'com.squareup.retrofit:retrofit:'
Then I can declare an interface called GitHubService that mirrors the API and declares the methods we need to consume this one:
public interface GitHubService {
    @GET("/users/{user}/repos")
    Call<List<DTORepo>> listRepos(@Path("user") final String psUser);
}
Next I obtain an implementation of this interface thanks the RestAdapter class, as follows:
final Retrofit loRetrofit = new Retrofit.Builder()
	.baseUrl("https://api.github.com")
	.build();

final GitHubService loService = loRetrofit.create(GitHubService.class);
return loService;
Another library I like to use is Merlin. I see it as an utility tool to be aware of the network connectivity state and changes. It provides a fluent API, simple to set up inside an Android project.
Personally, to get the network connectivity state, I use its MerlinsBeard class that I can initialize like:
final MerlinsBeard merlinsBeard = MerlinsBeard.from(context);
And then simple call to:
merlinsBeard.isConnected()
tells me if the network is reachable or not.
Parsing data
So, now we have our data coming from our remote server. It’s time to describe how to process it in order to get our POJOs. A common format to interchange data is JSON. No surprise at this point. And if you are familiar with the Java world, no more surprise when I tell you I’m going to set up a JSON parser using Jackson! Obviously, no need to explain that Jackson is still one of the most popular libraries in this subject.
Nevertheless, I would like to add some criterion that make me love Jackson:
First, I’m very satisfied with its fluent annotation API. And it’s pretty helpful to be able to get and store properties that are not declared through the @JsonProperty annotation. Actually, here is some code to illustrate my words:
public class Example {

	@JsonIgnore
	private Map<String, Object> mAdditionalProperties = new HashMap<String, Object>();

	@JsonAnyGetter
	public Map<String, Object> getAdditionalProperties() {
		return mAdditionalProperties;
	}

	@JsonAnySetter
	public void setAdditionalProperty(final String psName, final Object poValue) {
		mAdditionalProperties.put(psName, value poValue;
	}
}
But how useful could it be?
Just think of an unusual behavior: I get a NullPointerException (for example) while processing my data.
But why? Simply because the JSON key has changed server-side.
But how could I see it if the API team did not let me know… A dive to the debugger and we can see that the mAdditionalProperties contains our expected value, but with a different key. And here we are! No more time wasted to debug this point.
Combination with Retrofit
Cleverly, a dedicated Retrofit converter is available on GitHub: https://github.com/square/retrofit/tree/master/retrofit-converters/jackson.
We can simply add it to our build.gradle as follows:
compile 'com.squareup.retrofit2:converter-jackson:'
After that, we simply need to set it to our previous RestAdapter:
final Retrofit loRetrofit = new Retrofit.Builder()
	.baseUrl("https://api.github.com")
	.addConverterFactory(JacksonConverterFactory.create()) // add the Jackson specific converter
	.build();

final GitHubService loService = loRetrofit.create(GitHubService.class);
return loService;
Bonus
I frequently use the online tool named jsonschema2pojo. According to its description, it allows developers to
Generate Plain Old Java Objects from JSON or JSON-Schema.
To use it, we just have to paste a code snippet from the API, check the JSON radio of the Source type section. Using Jackson, I select the Jackson 2.x radio under the Annotation style section. Clicking on the Preview button gives me a Java class representing the JSON mapping I need. It cleverly speeds up my development!
An attractive alternative: Moshi
We can also adopt the emerging library provided by Square: Moshi.
They also provide the corresponding converter to configure Retrofit.
Another attractive alternative: LoganSquare
A powerful library named LoganSquare. It relies on compile-time annotation processing to generate parsing/serializing code.
We can find converters written to make it work in combination with Retrofit:
- https://github.com/aurae/retrofit-logansquare (officially referenced by the Retrofit’s wiki pages)
Communication between components and passing data
A frequently asked question in the Android ecosystem is:
- how to make components communicate together, and optionally pass parameters?
A common response is to set up an event bus. A lot of libraries provide solution to this problem, among which:
They have various approaches and motivations. But the one I chose is Otto, because I find it easy to:
- create a new bus instance
- register to this bus instance
- publish an event on this bus
Nothing revolutionary, isn’t it?
The key point of my choice comes from the official documentation:
To subscribe to an event, annotate a method with
@Subscribe. The method should take only a single parameter, the type of which will be the event you wish to subscribe to.
I like the fact that I simply have to set the good parameter to my subscribing method to perform a specific job for each event.
But, the real point under the hood is the event inheritance. Indeed, if I define an AbstractEventQueryDidFinish (and I do so!), and then, for each query, a dedicated termination event such as EventQueryADidFinish and EventQueryBDidFinish for example, I’m able to:
- define a method to be notified of a
EventQueryADidFinishpublication ; - define a method to be notified of a
EventQueryBDidFinishpublication ; - and, the most interesting for me, define a method to be notified of a
AbstractEventQueryDidFinishpublication.
Actually, it can be pretty useful to have a global interceptor that is notified when a query finished, with no matter how strong its type is.
For example, if you maintain a list of pending queries in an object (a synchronization engine for example), you can register this one to be notified of every AbstractEventQueryDidFinish.
So it becomes possible to refresh your pending queries list every time a request ends, and optionally store its result (failure or success).
Thread management
Otto provides an API to define on which thread we publish an event. Nevertheless, I defined my own bus subclass to ensure that the subscribers are notified on the main thread:
public class BusMainThread extends Bus {
    //region Field
    private final Handler mHandler = new Handler(Looper.getMainLooper());
    //endregion

    //region Constructor
    public BusMainThread(final String psName) {
        super(psName);
    }
    //endregion

    //region Overridden method
    @Override
    public void post(final Object event) {
        if (Looper.myLooper() == Looper.getMainLooper()) {
            super.post(event);
        } else {
            mHandler.post(() -> BusMainThread.super.post(event));
        }
    }
    //endregion
}
Finally, to have a little more control on the type of events that are published, I defined an abstract class:
public abstract class AbstractEvent { }
And then, to provide a unified interface to communicate with the bus instances, I defined the following facade:
public final class BusManager {

    //region Inner synthesize job
    private static final Bus sBusAnyThread = new Bus(ThreadEnforcer.ANY, "ANY_THREAD");
    private static final BusMainThread sBusMainThread = new BusMainThread("MAIN_THREAD");
    //endregion

    //region Specific any thread job
    public void registerSubscriberToBusAnyThread(final Object poSubscriber) {
        if (poSubscriber != null) {
            sBusAnyThread.register(poSubscriber);
        }
    }

    public void unregisterSubscriberFromBusAnyThread(final Object poSubscriber) {
        if (poSubscriber != null) {
            sBusAnyThread.unregister(poSubscriber);
        }
    }

    public void postEventOnAnyThread(final AbstractEvent poEvent) {
        if (poEvent != null) {
            sBusAnyThread.post(poEvent);
        }
    }
    //endregion

    //region Specific main thread job
    public void registerSubscriberToBusMainThread(final Object poSubscriber) {
        if (poSubscriber != null) {
            sBusMainThread.register(poSubscriber);
        }
    }

    public void unregisterSubscriberFromBusMainThread(final Object poSubscriber) {
        if (poSubscriber != null) {
            sBusMainThread.unregister(poSubscriber);
        }
    }

    public void postEventOnMainThread(final AbstractEvent poEvent) {
        if (poEvent != null) {
            sBusMainThread.post(poEvent);
        }
    }
    //endregion
}
Managing jobs
Multithreading and concurrency are recurrent developers’ considerations. It comes in combination with one of the most important rule when developing an Android application: don’t block the UI thread! It’s kind of “words of wisdom” but it’s important to keep it in mind permanently.
So, we can easily list some jobs that must not be done on the main thread:
- calls to the remote API
- database CRUD operations
- read a local file
- etc.
Fortunately, many resources come to the rescue: classes from the official Android SDK, blog posts, libraries and so on.
But one of the most useful resources I met is the “Android REST client applications” session from Google I/O 2010 by Virgil Dobjanschi:
- https://www.youtube.com/watch?v=xHXn3Kg2IQE
- https://dl.google.com/googleio/2010/android-developing-RESTful-android-apps.pdf
And I totally agree with his advice that is:
- use
Serviceclass from the Android SDK - set up a
ServiceHelperclass to facade the call to network requests - have dedicated classes to process queries results (called
Processorin this session)
To explain why the use of a Service, I’d just like to quote the official documentation:
A Service is an application component representing either an application’s desire to perform a longer-running operation while not interacting with the user
For me, it’s typically the meaning of the component that should perform my network requests. But we have to note that services
run in the main thread of their hosting process
So we still have to manage multithreading by ourselves. So we need a specific layer to perform queries asynchronously.
Yes, I know, Retrofit provides a mechanism to achieve this point. But I looked for a more generic layer, able to perform any job that needs to be done in background.
At this point, I discovered Android Priority Job Queue (Job Manager).
Android Priority Job Queue (Job Manager)
It’s probably one of the most documented, unit tested, powerful and reliable library I met. And it’s based on the Google I/O brought up previously.
To set it up, we need to follow two steps.
Job Manager Configuration
The JobManager is a key concept from this library. It’s responsible for queuing up and performing jobs. It’s designed to be as flexible as possible to allow the developer to build his own configuration.
It becomes possible to tell:
- how many threads can consume jobs at the same time
- how to persist jobs that cannot be performed at the moment
- how to retrieve network connectivity status
- which logger to use
You can find more information at the following URL: https://github.com/yigit/android-priority-jobqueue/wiki/Job-Manager-Configuration
As a sample, here is the configuration I use to perform network requests:
final Configuration loConfiguration = new Configuration.Builder(poContext)
	.minConsumerCount(1) // always keep at least one consumer alive
	.maxConsumerCount(3) // up to 3 consumers at a time
	.loadFactor(3) // 3 jobs per consumer
	.consumerKeepAlive(120) // wait 2 minute
	.build();

final JobManager loJobManager = new JobManager(poContext, loConfiguration);
Job Configuration
A way I love with this library, is to consider each network request as a specific Job. This is that abstract class we must extend if we want to configure a job. Thanks to its constructor, it’s highly-configurable. We can set some useful parameters to a job, as follow:
- its priority
- if it requires network to be performed
- if it should persist if it cannot be performed
- if it should run after some delay
- its retry policy
It’s also possible to group jobs so that they can be executed sequentially. It’s pretty useful if you want to design a messaging client for example.
All necessary information about job configuration can be found on this page: https://github.com/yigit/android-priority-jobqueue/wiki/Job-Configuration
The persistence engine of this library is very powerful. For example, if the network is unreachable, jobs are serialized and persist on the device. Once the network becomes reachable, the JobManager fetches the persisting jobs and performs them as usual.
I identified some redundant code when writing jobs to perform network requests. That’s why I wrote an abstract class that every query should extend:
public abstract class AbstractQuery extends Job {
    private static final String TAG = AbstractQuery.class.getSimpleName();
    private static final boolean DEBUG = true;

    protected enum Priority {
        LOW(0),
        MEDIUM(500),
        HIGH(1000);
        private final int value;

        Priority(final int piValue) {
            value = piValue;
        }
    }

    protected boolean mSuccess;
    protected Throwable mThrowable;
    protected AbstractEventQueryDidFinish.ErrorType mErrorType;

    //region Protected constructor
    protected AbstractQuery(final Priority poPriority) {
        super(new Params(poPriority.value).requireNetwork());
    }

    protected AbstractQuery(final Priority poPriority, final boolean pbPersistent, final String psGroupId, final long plDelayMs) {
        super(new Params(poPriority.value).requireNetwork().setPersistent(pbPersistent).setGroupId(psGroupId).setDelayMs(plDelayMs));
    }
    //endregion

    //region Overridden methods
    @Override
    public void onAdded() {
    }

    @Override
    public void onRun() throws Throwable {
        try {
            execute();
            mSuccess = true;
        } catch (Throwable loThrowable) {
            if (BuildConfig.DEBUG && DEBUG) {
                Logger.t(TAG).e(loThrowable, "");
            }
            mErrorType = AbstractEventQueryDidFinish.ErrorType.UNKNOWN;
            mThrowable = loThrowable;
            mSuccess = false;
        }

        postEventQueryFinished();
    }

    @Override
    protected void onCancel() {
    }

    @Override
    protected int getRetryLimit() {
        return 1;
    }
    //endregion

    //region Protected abstract method for specific job
    protected abstract void execute() throws Exception;

    protected abstract void postEventQueryFinished();

    public abstract void postEventQueryFinishedNoNetwork();
    //endregion
}
It defines:
- an
enumdescribing available priorities I need - two constructors to provide both a simple and a complex way to build the query
- the way to perform the specific code and how the exceptions are handled
- a default retry limit
We can see that there are three methods to implement:
-
execute: the specific code to perform -
postEventQueryFinished: the way to notify observers of the job termination (success or failure) -
postEventQueryFinishedNoNetwork: the way to notify observers of the job termination because the network is unreachable
The two last methods are often based on the bus concept I talked about previously. Considering I’m using Otto to communicate between components, here comes the abstract event I defined:
public abstract class AbstractEventQueryDidFinish<QueryType extends AbstractQuery> extends AbstractEvent {
    public enum ErrorType {
        UNKNOWN,
        NETWORK_UNREACHABLE
    }

    public final QueryType query;

    public final boolean success;
    public final ErrorType errorType;
    public final Throwable throwable;

    public AbstractEventQueryDidFinish(final QueryType poQuery, final boolean pbSuccess, final ErrorType poErrorType, final Throwable poThrowable) {
        query = poQuery;
        success = pbSuccess;
        errorType = poErrorType;
        throwable = poThrowable;
    }
}
It’s designed to embed:
- the query that just finished
- the termination status
- and, optionally, the type of error and
Throwableobjet that occurred
Each query I defined could publish a specific event, subclassing AbstractEventQueryDidFinish, to notify about its termination with status.
Putting it all together, here is a code snippet of the query I defined to get GitHub repositories of a given user:
public class QueryGetRepos extends AbstractQuery {
    private static final String TAG = QueryGetRepos.class.getSimpleName();
    private static final boolean DEBUG = true;

    //region Fields
    public final String user;
    //endregion

    //region Constructor matching super
    protected QueryGetRepos(@NonNull final String psUser) {
        super(Priority.MEDIUM);
        user = psUser;
    }
    //endregion

    //region Overridden method
    @Override
    protected void execute() throws Exception {
        final GitHubService gitHubService = // specific code to get GitHubService instance

        final Call<List<DTORepo>> loCall = gitHubService.listRepos(user);
        final Response<List<DTORepo>> loExecute = loCall.execute();
        final List<DTORepo> loBody = loExecute.body();

        // TODO deal with list of DTORepo
    }

    @Override
    protected void postEventQueryFinished() {
        final EventQueryGetRepos loEvent = new EventQueryGetRepos(this, mSuccess, mErrorType, mThrowable);
        busManager.postEventOnMainThread(loEvent);
    }

    @Override
    public void postEventQueryFinishedNoNetwork() {
        final EventQueryGetRepos loEvent = new EventQueryGetRepos(this, false, AbstractEventQueryDidFinish.ErrorType.NETWORK_UNREACHABLE, null);
        busManager.postEventOnMainThread(loEvent);
    }
    //endregion

    //region Dedicated EventQueryDidFinish
    public static final class EventQueryGetRepos extends AbstractEventQueryDidFinish<QueryGetRepos> {
        public EventQueryGetRepos(final QueryGetRepos poQuery, final boolean pbSuccess, final ErrorType poErrorType, final Throwable poThrowable) {
            super(poQuery, pbSuccess, poErrorType, poThrowable);
        }
    }
    //endregion
}
And now, with a simple proxy class I call QueryFactory (it’s very close to the ServiceHelper mentioned by Virgil Dobjanschi), I can easily start every request with a strong protocol to conform to:
public class QueryFactory {
    //region Build methods
    public QueryGetRepos buildQueryGetRepos(@NonNull final String psUser) {
        return new QueryGetRepos(psUser);
    }
    //endregion

    //region Start methods
    public void startQuery(@NonNull final Context poContext, @NonNull final AbstractQuery poQuery) {
        final Intent loIntent = new ServiceQueryExecutorIntentBuilder(poQuery).build(poContext);
        poContext.startService(loIntent);
    }

    public void startQueryGetRepos(@NonNull final Context poContext, @NonNull final String psUser) {
        final QueryGetRepos loQuery = buildQueryGetRepos(psUser);
        startQuery(poContext, loQuery);
    }
    //endregion
}
The service to handle the query is declared as follows:
public class ServiceQueryExecutor extends IntentService {
    private static final String TAG = ServiceQueryExecutor.class.getSimpleName();

    //region Extra fields
    AbstractQuery query;
    //endregion

    MerlinsBeard merlinsBeard;
    JobManager jobManager;

    //region Constructor matching super
    /**
     * Creates an IntentService.  Invoked by your subclass's constructor.
     */
    public ServiceQueryExecutor() {
        super(TAG);
    }
    //endregion

    //region Overridden methods
    @DebugLog
    @Override
    protected void onHandleIntent(final Intent poIntent) {
        // TODO get AbstractQuery from Intent
        // TODO get MerlinsBeard and JobManager instances

        // If query requires network, and if network is unreachable, and if the query must not persist
        if (query.requiresNetwork() &&
                !merlinsBeard.isConnected() &&
                !query.isPersistent()) {
            // then, we post an event to notify the job could not be done because of network connectivity
            query.postEventQueryFinishedNoNetwork();
        } else {
            // otherwise, we can add the job
            jobManager.addJobInBackground(query);
        }
    }
    //endregion
}
And here we have a consistent structure to manage network queries in a proper way that follows the guidelines from the Google I/O 2010.
RxJava
Another approach is to adopt RxJava. It allows developers to build asynchronous programs with an event-based mechanism using Observable.
ReactiveX provides Android specific bindings.
It can be pretty useful. We will see how I use it to perform CRUD operations on the database.
Data persistence
The ORM way
In software development, the Object-Relational Mapping (ORM) is a widely used technique. Different libraries exist for the various languages (Doctrine for PHP or Hibernate for Java for example).
The motivation to use an ORM is to easily set up and configure a SQLite database on Android. It’s also very powerful when setting up relationships. At least, it provides a very fluent API to execute CRUD operations on the database.
OrmLite
![]()
That’s why I chose one of the most famous ORM on Android: OrmLite.
The first step is to set up our POJO to be mapped by ORMLite.
I created an abstract class to match the classical Android approach with its _id column:
public abstract class AbstractOrmLiteEntity {
    @DatabaseField(columnName = BaseColumns._ID, generatedId = true)
    protected long _id;

    //region Getter
    public long getBaseId() {
        return _id;
    }
    //endregion
}
Now I simply create my POJO class (i.e., RepoEntity for this example):
@DatabaseTable(tableName = "REPO", daoClass = DAORepo.class)
public class RepoEntity extends AbstractOrmLiteEntity {
    @DatabaseField
    public Integer id;

    @DatabaseField
    public String name;

    @DatabaseField
    public String location;

    @DatabaseField
    public String url;
}
Now let’s have a look at the DAO. This design pattern aims at accessing to the concrete data through an abstract interface. It describes and implements specific data operations to conform to the single responsibility principle.
Fortunately, OrmLite provides the Dao interface and its implementation: BaseDaoImpl. All the traditional CRUD operations I need are available.
Unfortunately, there are executed synchronously. That’s where RxJava comes in handy to perform those operations asynchronously.
So I rewrote all the available methods in a RxJava way.
So I created an interface as follows:
public interface IRxDao<T, ID> extends Dao<T, ID>
where I declared all the available methods of Dao with the “rx” prefix. They all return an Observable object with the type of return from the standard method.
Then I implemented this interface through an abstract class I declared like:
public abstract class RxBaseDaoImpl<DataType extends AbstractOrmLiteEntity, IdType> extends BaseDaoImpl<DataType, IdType> implements IRxDao<DataType, IdType>
As I always use long as ID type, I define the following interface:
public interface IOrmLiteEntityDAO<DataType extends AbstractOrmLiteEntity> extends Dao<DataType, Long> {
}
and abstract class:
public abstract class AbstractBaseDAOImpl<DataType extends AbstractOrmLiteEntity> extends RxBaseDaoImpl<DataType, Long> implements IOrmLiteEntityDAO<DataType> {
    //region Constructors matching super
    protected AbstractBaseDAOImpl(final Class<DataType> poDataClass) throws SQLException {
        super(poDataClass);
    }

    public AbstractBaseDAOImpl(final ConnectionSource poConnectionSource, final Class<DataType> poDataClass) throws SQLException {
        super(poConnectionSource, poDataClass);
    }

    public AbstractBaseDAOImpl(final ConnectionSource poConnectionSource, final DatabaseTableConfig<DataType> poTableConfig) throws SQLException {
        super(poConnectionSource, poTableConfig);
    }
    //endregion
}
So the declaration of my DAORepo simply becomes:
public class DAORepo extends AbstractBaseDAOImpl<RepoEntity> {
    //region Constructors matching super
    public DAORepo(final ConnectionSource poConnectionSource) throws SQLException {
        this(poConnectionSource, RepoEntity.class);
    }

    public DAORepo(final ConnectionSource poConnectionSource, final Class<RepoEntity> poDataClass) throws SQLException {
        super(poConnectionSource, poDataClass);
    }

    public DAORepo(final ConnectionSource poConnectionSource, final DatabaseTableConfig<RepoEntity> poTableConfig) throws SQLException {
        super(poConnectionSource, poTableConfig);
    }
    //endregion
}
Moreover, ORMLite provides an abstract subclass of SQLiteOpenHelper, called OrmLiteSqliteOpenHelper. So, to declare our open helper, we simply have to write:
public class DatabaseHelperAndroidStarter extends OrmLiteSqliteOpenHelper {
    private static final String DATABASE_NAME = "android_starter.db";
    private static final int DATABASE_VERSION = 1;

    //region Constructor
    public DatabaseHelperAndroidStarter(@NonNull final Context poContext) {
        super(poContext, DATABASE_NAME, null, DATABASE_VERSION);
    }
    //endregion

    //region Methods to override
    @Override
    @SneakyThrows(SQLException.class)
    public void onCreate(@NonNull final SQLiteDatabase poDatabase, @NonNull final ConnectionSource poConnectionSource) {
        TableUtils.createTable(poConnectionSource, RepoEntity.class);
    }

    @Override
    @SneakyThrows(SQLException.class)
    public void onUpgrade(@NonNull final SQLiteDatabase poDatabase, @NonNull final ConnectionSource poConnectionSource, final int piOldVersion, final int piNewVersion) {
        TableUtils.dropTable(poConnectionSource, RepoEntity.class, true);
        onCreate(poDatabase, poConnectionSource);
    }
    //endregion
}
We can see that ORMLite provides the utility class TableUtils, where helpful methods can create or drop a table according to its mapped Java class.
At this time, don’t pay attention to the @SneakyThrows. It comes from Lombok and is used to throw checked exceptions. Just remember that it allows us not to write the try/catch statement by ourselves, the annotation processor writes it for us.
Now, it becomes very easy to deal with data. We just need a DatabaseHelperAndroidStarter:
public DatabaseHelperAndroidStarter getDatabaseHelperAndroidStarter(@NonNull final Context poContext) {
	return new DatabaseHelperAndroidStarter(poContext);
}
and we can get an instance of the DAORepo as follows:
public DAORepo getDAORepo(@NonNull final DatabaseHelperAndroidStarter poDatabaseHelperAndroidStarter) {
	return new DAORepo(poDatabaseHelperAndroidStarter.getConnectionSource());
}
In a Fragment, we can get all the repo through the following call:
private void rxGetRepos() {
    mSubscriptionGetRepos = daoRepo.rxQueryForAll()
            .subscribeOn(Schedulers.newThread())
            .observeOn(AndroidSchedulers.mainThread())
            .subscribe(
                    (final List<RepoEntity> ploRepos) -> { // onNext
                        // TODO deal with repos
                    },
                    (final Throwable poException) -> { // onError
                        mSubscriptionGetRepos = null;
                        // TODO deal with error
                    },
                    () -> { // onCompleted
                       mSubscriptionGetRepos = null;
                    }
            );
}
But a question remains: how to get a repo from the network, parse it and store it in our database?
A simple response could be to gather all annotations in the same Java class. But we obtain a class with the responsibilities of both the network and the database configuration.
My goal is to keep a class to interact with the network, DTORepo ; and one to map the database, RepoEntity. Basically, they have common fields, with the same names. So I need a tool to convert DTO to Entity. That’s where Android Transformer comes to the rescue:
![]()
It provides two main annotations:
-
@Mappableto indicate the class it is mapped to -
@Mappedto indicate a member should be mapped
So, our RepoEntity class becomes:
@Mappable(with = DTORepo.class)
@DatabaseTable(tableName = "REPO", daoClass = DAORepo.class)
public class RepoEntity extends AbstractOrmLiteEntity implements Serializable {
    @Mapped
    @DatabaseField
    public Integer id;

    @Mapped
    @DatabaseField
    public String name;

    @Mapped
    @DatabaseField
    public String location;

    @Mapped
    @DatabaseField
    public String url;
}
And now we can transform a DTO to an Entity as follows:
final Transformer loTransformerRepo = new Transformer.Builder().build(RepoEntity.class);
final RepoEntity loRepo = loTransformerRepo.transform(loDTORepo, RepoEntity.class);
As a conclusion:
- we have a simple way to define a new class mapping a SQLite table
- we conform to the single responsibility principle by providing a dedicated implementation of
AbstractBaseDAOImpl - we access to CRUD operations, in an asynchronous way, thanks to RxJava
Note that we can boost the DAOs creations by generating an ORMLite configuration file at compile-time thanks to the “ormgap” plugin.
The ContentProvider way
A widely used approach is to set up a ContentProvider. Personally, I came to it thanks to the iosched open-source application by Google. That’s where I saw how to configure and use this concept.
I’d like to say that I find that it’s a powerful mechanism, especially when it’s used in combination with Cursor and its derivatives like CursorLoader and CursorAdapter.
It’s efficient and reliable. Moreover, it can be boosted up with some tips like overriding the bulkInsert method and use a single SQL transaction.
The only thing I regret is that it’s not pretty to set up and we have to write a lot of boilerplate code.
That’s why I looked for a simpler solution to easily declare my content provider, but also to maintain control over the implementation of some methods of the content provider. In other words, I must deal with a ContentProvider subclass.
That’s why I like ProviGen.
Here are the advantages I see:
- it’s simple to declare a contract class, a common practice when using content providers
- we deal with a
ProviGenProvider, that is a subclass ofContentProvider - it provides a default implementation of the
SQLiteOpenHelper - it’s possible to provide a custom implementation of the
SQLiteOpenHelper - a
TableBuilderclass is available to help developers building their SQL tables with a fluent API
Each “model” class has its own contract class.
In a few lines, the ProviGenProvider subclass provides a way to register all these contract classes.
It becomes very fast to set up a basic content provider. To maintain control over this implementation, we can
- add custom URIs and deal with it (for more complex jobs for example)
- speed up the content provider performances
Another tool I like to speed up content provider management is MicroOrm. Just annotate your POJO with @Column, giving it the name of the column to bind (the constant coming from the contract class is perfect for that!), and then you can:
- build
ContentValueseasily through aMicroOrminstance and itstoContentValuesmethod, taking a POJO instance as parameter - build a POJO instance from a
Cursorthanks to thefromCursormethod of theMicroOrminstance - build a list of POJO from a
Cursorthanks to thelistFromCursormethod of theMicroOrminstance
It’s a very simple way to deal with Cursor and ContentValues, unavoidable when using a content provider.
Dependency injection
The dependency injection (a.k.a. “DI”) is a powerful design pattern that implements “inversion of control” (IoC) to resolve dependencies.
No need to remind you how useful can be the DI:
- easy to read
- easy to maintain
- easy to test (because it’s easy to mock an element)
A major solution to use DI on Android is Dagger2. The main advantage I see is that the dependency analysis is done at compile time. So potential errors are notified as soon as possible.
This is not the place to detail all the capabilities of Dagger2. This article, written by Kerry Perez Huanca, provides a good summary of the Dagger2 workflow with its key concepts:
- Identify the dependent objects and their dependencies.
- Create a class with the
@Moduleannotation, using the@Providesannotation for every method that returns a dependency. - Request dependencies in your dependent objects using the
@Injectannotation. - Create an interface using the
@Componentannotation and add the classes with the@Moduleannotation created in the second step. - Create an object of the
@Componentinterface to instantiate the dependent objects with their dependencies.
To have a full taste of Dagger2, I suggest you to read this excellent article written by Fernando Cejas.
Now, according to our sample project, following the workflow described up above, let’s set up Dagger2 in the project.
1. Identify the dependent objects and their dependencies:
- the
ServiceQueryExecutorrequires an instance ofJobManager - the
ServiceQueryExecutorrequires an instance ofMerlinsBeard - each query needs a
BusManagerto publish its termination - each observer (
Fragmentfor example) requires aBusManagerto register and listen for queries termination - each DAO needs a
DatabaseHelperAndroidStarterto be built successfully - some queries need a
DAORepoto delete, insert or update a repo - some queries need a
Transformerto convertDTORepotoRepoEntity - some elements need a
DAORepoto query a repo - all queries needs a
GitHubServiceto perform REST calls - invoking elements requires an instance of
QueryFactoryto start REST calls
2. It’s now time to have a look at our modules, for example:
-
ModuleAsync:
@Module
public class ModuleAsync {

    @Provides
    @Singleton
    public JobManager provideJobManager(@NonNull final Context poContext) {
        final Configuration loConfiguration = new Configuration.Builder(poContext)
                .minConsumerCount(1) // always keep at least one consumer alive
                .maxConsumerCount(3) // up to 3 consumers at a time
                .loadFactor(3) // 3 jobs per consumer
                .consumerKeepAlive(120) // wait 2 minute
                .build();
        return new JobManager(poContext, loConfiguration);
    }
}
-
ModuleBus:
@Module
public class ModuleBus {

    @Provides
    @Singleton
    public BusManager provideBusManager() {
        return new BusManager();
    }
}
-
ModuleContext:
@Module
public class ModuleContext {
    private final Context mContext;

    public ModuleContext(@NonNull final Context poContext) {
        mContext = poContext;
    }

    @Provides
    public Context provideContext() {
        return mContext;
    }
}
-
ModuleDatabase:
@Module
public class ModuleDatabase {
    private static final String TAG = ModuleDatabase.class.getSimpleName();
    private static final boolean DEBUG = true;

    @Provides
    @Singleton
    public DatabaseHelperAndroidStarter provideDatabaseHelperAndroidStarter(@NonNull final Context poContext) {
        return new DatabaseHelperAndroidStarter(poContext);
    }

    @Provides
    @Singleton
    public DAORepo provideDAORepo(@NonNull final DatabaseHelperAndroidStarter poDatabaseHelperAndroidStarter) {
        try {
            final ConnectionSource loConnectionSource = poDatabaseHelperAndroidStarter.getConnectionSource();
            final DatabaseTableConfig<RepoEntity> loTableConfig = DatabaseTableConfigUtil.fromClass(loConnectionSource, RepoEntity.class);
            if(loTableConfig != null) {
                return new DAORepo(loConnectionSource, loTableConfig);
            } else {
                return new DAORepo(loConnectionSource);
            }
        } catch (final SQLException loException) {
            if (BuildConfig.DEBUG && DEBUG) {
                Logger.t(TAG).e(loException, "");
            }
        }
        return null;
    }
}
-
ModuleEnvironment:
@Module
public class ModuleEnvironment {

    @Provides
    @Singleton
    public IEnvironment provideEnvironment() {
        return BuildConfig.ENVIRONMENT;
    }
}
-
ModuleRest:
@Module
public class ModuleRest {

    @Provides
    @Singleton
    public OkHttpClient provideOkHttpClient(@NonNull final IEnvironment poEnvironment) {
        final HttpLoggingInterceptor loHttpLoggingInterceptor = new HttpLoggingInterceptor();
        loHttpLoggingInterceptor.setLevel(poEnvironment.getHttpLoggingInterceptorLevel());
        return new OkHttpClient.Builder()
                .addInterceptor(loHttpLoggingInterceptor)
                .build();
    }

    @Provides
    @Singleton
    public GitHubService provideGithubService(@NonNull final OkHttpClient poOkHttpClient) {
        final Retrofit loRetrofit = new Retrofit.Builder()
                .baseUrl("https://api.github.com")
                .client(poOkHttpClient)
                .addConverterFactory(JacksonConverterFactory.create())
                .addCallAdapterFactory(new ErrorHandlingExecutorCallAdapterFactory(new ErrorHandlingExecutorCallAdapterFactory.MainThreadExecutor()))
                .build();
        return loRetrofit.create(GitHubService.class);
    }

    @Provides
    @Singleton
    public QueryFactory provideQueryFactory() {
        return new QueryFactory();
    }

    @Provides
    @Singleton
    public Merlin provideMerlin(@NonNull final Context poContext) {
        return new Merlin.Builder()
                .withConnectableCallbacks()
                .withDisconnectableCallbacks()
                .withBindableCallbacks()
                .withLogging(true)
                .build(poContext);
    }

    @Provides
    @Singleton
    public MerlinsBeard provideMerlinsBeard(@NonNull final Context poContext) {
        return MerlinsBeard.from(poContext);
    }

    @Provides
    @Singleton
    public Picasso providePicasso(@NonNull final Context poContext) {
        final Picasso loPicasso = Picasso.with(poContext);
        loPicasso.setIndicatorsEnabled(true);
        loPicasso.setLoggingEnabled(true);
        return loPicasso;
    }

    @Provides
    @Singleton
    public PicassoModule providePicassoModule(@NonNull final Picasso poPicasso) {
        return  new PicassoModule(poPicasso);
    }
}
-
ModuleTransformer:
@Module
public class ModuleTransformer {
    public static final String TRANSFORMER_REPO = "TRANSFORMER_REPO";

    @Provides
    @Singleton
    @Named(TRANSFORMER_REPO)
    public Transformer provideTransformerRepo() {
        return new Transformer.Builder()
                .build(RepoEntity.class);
    }
}
Concerning the last one, ModuleTransformer, as it’s impossible to strongly type an instance of Transformer, we use the naming convention thanks to the @Named annotation.
It now can be injected like:
@Inject
@Named(ModuleTransformer.TRANSFORMER_REPO)
Transformer transformerRepo;
To speed up the set up of components, I use the annotations-based Auto-Dagger2 library. Annotations are processed at compilation time to generate the boilerplate code of the components.
On the one hand, I’ve to declare my Application subclass like this:
@AutoComponent(
        modules = {
                ModuleAsync.class,
                ModuleBus.class,
                ModuleContext.class,
                ModuleDatabase.class,
                ModuleEnvironment.class,
                ModuleRest.class,
                ModuleTransformer.class
        }
)
@Singleton
public class ApplicationAndroidStarter extends MultiDexApplication
The @AutoComponent lists all the modules to provide it in the generated component.
On the other hand, on each element that needs injected elements, I add the @AutoInjector(ApplicationAndroidStarter.class) annotation, pointing on the class annotated with @AutoComponent. This way, I obtain a valid component declaration, auto-generated, as follows:
@Component(
    modules = {
        ModuleAsync.class,
        ModuleBus.class,
        ModuleContext.class,
        ModuleDatabase.class,
        ModuleEnvironment.class,
        ModuleRest.class,
        ModuleTransformer.class
    }
)
@Singleton
public interface ApplicationAndroidStarterComponent {
  void inject(ApplicationAndroidStarter applicationAndroidStarter);

  void inject(ServiceQueryExecutor serviceQueryExecutor);

  void inject(QueryGetRepos queryGetRepos);

  void inject(FragmentRepoList fragmentRepoList);

  // ...

}
It allows me not to write the code of the component, and not to add manually an inject method each time a new element needs injections.
For example, my ServiceQueryExecutor is simply declared as follows:
@AutoInjector(ApplicationAndroidStarter.class)
public class ServiceQueryExecutor extends IntentService
What a precious time saving, isn’t it?
The MVP architecture
As an introduction to the MVP architecture, its motivations and its benefits, I invite you to read the very interesting website coming with the Mosby library.
All you need to know about MVP fundamentals, ViewState and LCE (Loading-Content-Error) is well explained in this website.
Another useful tool is the Android DataBinding library. Using this one makes our View and our Model tightly coupled and having a bidirectional binding. It’s the glue we were missing. With a few configurations, we can plug the view (its layout.xml file and Activity/Fragment) to the model (traditionally, a POJO). I let the official documentation tells you how to use this library.
To explain the MVP architecture using Mosby, I’m going to present the use case of displaying the detail of a repo.
The first step is to design the model class corresponding to the screen we are going to display:
public final class ModelRepoDetail {
    public final RepoEntity repo; // the repo to display

    public ModelRepoDetail(final RepoEntity poRepo) {
        repo = poRepo;
    }
}
Now we define the corresponding View interface:
public interface ViewRepoDetail extends MvpLceView<ModelRepoDetail> {
    void showEmpty();
}
The next step is to define the presenter:
@AutoInjector(ApplicationAndroidStarter.class) // to automatically add inject method in component
public final class PresenterRepoDetail extends MvpBasePresenter<ViewRepoDetail> {

    //region Injected fields
    @Inject
    DAORepo daoRepo; // we need the DAO to load the repo from its ID
    //endregion

    //region Fields
    private Subscription mSubscriptionGetRepo; // the RxJava subscription, to destroy it when needed
    //endregion

    //region Constructor
    public PresenterRepoDetail() {
        // inject necessary fields via the component
        ApplicationAndroidStarter.sharedApplication().componentApplication().inject(this);
    }
    //endregion

    //region Visible API
    public void loadRepo(final long plRepoId, final boolean pbPullToRefresh) {
        if (isViewAttached()) {
            getView().showLoading(pbPullToRefresh);
        }
        // get repo asynchronously via RxJava
        rxGetRepo(plRepoId);
    }

    public void onDestroy() {
        // destroy the RxJava subscribtion
        if (mSubscriptionGetRepo != null) {
            mSubscriptionGetRepo.unsubscribe();
            mSubscriptionGetRepo = null;
        }
    }
    //endregion

    //region Reactive job
    private void rxGetRepo(final long plRepoId) {
        mSubscriptionGetRepo = getDatabaseRepo(plRepoId)
                .subscribeOn(Schedulers.newThread())
                .observeOn(AndroidSchedulers.mainThread())
                .subscribe(
                        (final RepoEntity poRepo) -> { // onNext
                            if (isViewAttached()) {
                                getView().setData(new ModelRepoDetail(poRepo));
                                if (poRepo == null) {
                                    getView().showEmpty();
                                } else {
                                    getView().showContent();
                                }
                            }
                        },
                        (final Throwable poException) -> { // onError
                            mSubscriptionGetRepo = null;
                            if (isViewAttached()) {
                                getView().showError(poException, false);
                            }
                        },
                        () -> { // onCompleted
                            mSubscriptionGetRepo = null;
                        }
                );
    }
    //endregion

    //region Database job
    @RxLogObservable
    private Observable<RepoEntity> getDatabaseRepo(final long plRepoId) {
        return daoRepo.rxQueryForId(plRepoId);
    }
    //endregion
}
The main code is placed in the rxGetRepo method: it loads data from the database and asks the view to configure itself according to the result (success: it should display data ; failure: it should display an error).
And now, let’s have a look at the FragmentRepoDetail. Considering Mosby explanation, this fragment is part of the View. So, it should implement the ViewRepoDetail we defined. To be the closest to Mosby API, we make it inherit from MvpFragment, providing generic types ViewRepoDetail (for the View) and PresenterRepoDetail (for the Presenter).
So what we get:
@FragmentWithArgs
public class FragmentRepoDetail
        extends MvpFragment<ViewRepoDetail, PresenterRepoDetail>
        implements ViewRepoDetail {

    //region FragmentArgs
    @Arg
    Long mItemId;
    //endregion

    //region Fields
    private Switcher mSwitcher;
    //endregion

    //region Injected views
    @Bind(R.id.FragmentRepoDetail_TextView_Empty)
    TextView mTextViewEmpty;
    @Bind(R.id.FragmentRepoDetail_TextView_Error)
    TextView mTextViewError;
    @Bind(R.id.FragmentRepoDetail_ProgressBar_Loading)
    ProgressBar mProgressBarLoading;
    @Bind(R.id.FragmentRepoDetail_ContentView)
    LinearLayout mContentView;
    //endregion

    //region Data-binding
    private FragmentRepoDetailBinding mBinding;
    //endregion

    //region Default constructor
    public FragmentRepoDetail() {
    }
    //endregion

    //region Lifecycle
    @Override
    public void onCreate(final Bundle poSavedInstanceState) {
        super.onCreate(poSavedInstanceState);
        FragmentArgs.inject(this);
    }

    @Override
    public View onCreateView(final LayoutInflater poInflater, final ViewGroup poContainer,
                             final Bundle savedInstanceState) {
        mBinding = DataBindingUtil.inflate(poInflater, R.layout.fragment_repo_detail, poContainer, false);
        return mBinding.getRoot();
    }

    @Override
    public void onViewCreated(final View poView, final Bundle poSavedInstanceState) {
        super.onViewCreated(poView, poSavedInstanceState);

        ButterKnife.bind(this, poView);

        mSwitcher = new Switcher.Builder()
                .withEmptyView(mTextViewEmpty)
                .withProgressView(mProgressBarLoading)
                .withErrorView(mTextViewError)
                .withContentView(mContentView)
                .build();

        loadData(false);
    }

    @Override
    public void onDestroyView() {
        super.onDestroyView();

        ButterKnife.unbind(this);

        if (mBinding != null) {
            mBinding.unbind();
            mBinding = null;
        }
    }
    //endregion

    //region MvpFragment
    @Override
    public PresenterRepoDetail createPresenter() {
        return new PresenterRepoDetail();
    }
    //endregion

    //region ViewRepoDetail
    @Override
    public void showEmpty() {
        mSwitcher.showEmptyView();
    }
    //endregion

    //region MvpLceView
    @Override
    public void showContent() {
        mSwitcher.showContentView();
    }

    @Override
    public void showLoading(final boolean pbPullToRefresh) {
        mSwitcher.showProgressView();
    }

    @Override
    public void showError(final Throwable poThrowable, final boolean pbPullToRefresh) {
        mSwitcher.showErrorView();
    }

    @Override
    public void setData(final ModelRepoDetail poData) {
        mBinding.setRepo(poData.repo);

        final Activity loActivity = this.getActivity();
        final CollapsingToolbarLayout loAppBarLayout = (CollapsingToolbarLayout) loActivity.findViewById(R.id.ActivityRepoDetail_ToolbarLayout);
        if (loAppBarLayout != null) {
            loAppBarLayout.setTitle(poData.repo.url);
        }
    }

    @Override
    public void loadData(final boolean pbPullToRefresh) {
        if (mItemId == null) {
            mSwitcher.showErrorView();
        } else {
            getPresenter().loadRepo(mItemId.longValue(), pbPullToRefresh);
        }
    }
    //endregion
}
At this point, don’t worry, some annotations and classes are going to be described in a next section (@FragmentArgsInherited, @Arg, @Bind, FragmentArgs, ButterKnife and Switcher).
Finally, just have a look at the corresponding layout:
<?xml version="1.0" encoding="utf-8"?>
<layout xmlns:android="http://schemas.android.com/apk/res/android"
        xmlns:tools="http://schemas.android.com/tools">

    <data>
        <variable
            name="repo"
            type="fr.guddy.androidstarter.database.entities.RepoEntity"/>
    </data>

    <FrameLayout
        android:layout_width="match_parent"
        android:layout_height="match_parent"
        android:orientation="vertical">

        <TextView
            android:id="@+id/FragmentRepoDetail_TextView_Empty"
            android:layout_width="match_parent"
            android:layout_height="match_parent"
            android:gravity="center"
            android:text="@string/empty_repo"/>

        <TextView
            android:id="@+id/FragmentRepoDetail_TextView_Error"
            android:layout_width="match_parent"
            android:layout_height="match_parent"
            android:gravity="center"
            android:text="@string/error_repo"/>

        <ProgressBar
            android:id="@+id/FragmentRepoDetail_ProgressBar_Loading"
            style="?android:attr/progressBarStyleLarge"
            android:layout_width="wrap_content"
            android:layout_height="wrap_content"
            android:layout_gravity="center"/>

        <LinearLayout
            android:id="@+id/FragmentRepoDetail_ContentView"
            android:layout_width="match_parent"
            android:layout_height="match_parent"
            android:orientation="vertical">

            <TextView
                android:id="@+id/FragmentRepoDetail_TextView_Name"
                style="?android:attr/textAppearanceLarge"
                android:layout_width="match_parent"
                android:layout_height="wrap_content"
                android:padding="16dp"
                android:text="@{repo.name}"
                android:textIsSelectable="true"/>

            <TextView
                android:id="@+id/FragmentRepoDetail_TextView_Location"
                style="?android:attr/textAppearanceMedium"
                android:layout_width="match_parent"
                android:layout_height="wrap_content"
                android:padding="16dp"
                android:text="@{repo.location}"
                android:textIsSelectable="true"/>

            <TextView
                android:id="@+id/FragmentRepoDetail_TextView_Url"
                style="?android:attr/textAppearanceSmall"
                android:layout_width="match_parent"
                android:layout_height="wrap_content"
                android:padding="16dp"
                android:text="@{repo.url}"
                android:textIsSelectable="true"/>
        </LinearLayout>
    </FrameLayout>
</layout>
We can see the different views we are going to play with (the LCE). And we can see the DataBinding in action to bind views to the model we defined.
Thanks to the MVP architecture we set, we gain a lot when structuring our code:
- a dedicated class to load and present the suitable data: the Presenter
- a class to represent the data we should display: the Model
- a tuple <
Fragment, layout> to represent the way we display data: the View
With this well-structured and decoupled approach, it’s easy to add a new screen, organize its code and maintain the project. Moreover, the presenter (where all the business logic takes place) can be easily unit tested by mocking the View part.
Write thinner classes
Having in mind the huge number of listeners, the boilerplate code to display specific views and content, handling user interactions (button click, text changes, menu item click)… and so on, it’s common to write Activity/Fragment with a huge number of lines, methods and interfaces. It could become very difficult to read these files.
This section aims at writing this code in a different way:
- is it possible to reorganize it in meaningful layers?
- is it possible to get rid of boilerplate code and automate its generation?
I’m going to give some ideas to answer these questions.
Benefits of Java annotations and Annotation Processing Tool (APT)
A major step forward in Android development was the release of the android-apt project, by Hugo Visser.
It allows developers to configure, in the gradle build file, the compile-time annotation processing. Most of the time, libraries using it generate the boilerplate code developer should not have to write.
Let’s have a look to some libraries using Java annotations to drastically simplify Android development, and sometimes built upon android-apt.
Butter Knife
A definitely “must-have library”, quoted in every listing!
It has annotations processor to bind a lot of resources considerations to Java code:
- bind a view by its ID to a Java
Viewobject, idem for a list of views - bind string resources by their IDs to a Java
Stringobject, idem for drawables, colors, dimensions and so on - listen to the click on a view (or a list of views) by its ID and call a specific method
- listen to item selection in a
ListView - listen to some events on views like
OnCheckedChanged,OnEditorAction,OnFocusChange,OnTextChanged, etc.
A huge advantage I see is that: when you add a new widget in your layout, using the “native” way, you should
- define the associated field in your Java class
- call the
findViewByIdmethod - cast the result
Now, with Butter Knife, simply define the associated field and annotate it. The ButterKnife.bind will replace the two next steps. So, you add a widget faster!
Using it with its Android Studio plugin, and you go even faster! Nothing to add!
FragmentArgs
When the Fragments API released, this article was my guidelines: The Android 3.0 Fragments API.
But, the more I created fragments, the more a question grew in my mind:
Is there a way to get rid of the static
newInstanceI spend so much time writing?
Well OK, not so much in fact, but I found it so painful to rewrite each time to add a new fragment. That’s why I looked for a way to automate it. And here comes FragmentArgs!
It provides simple annotations to set up to your fragment, and the annotation processor generates you the builder class that corresponds. By using the word “builder”, the hint is that you can specify that some parameters are optional.
That way, you gain a formal contract to create your fragment, you are sure of which parameters to provide and you reduce risks to badly configure this one.
IntentBuilder
After using FragmentArgs, I asked myself how to start activities and services in the same way. My motivations are pretty much the same that for FragmentArgs. The collateral benefit is that I gain a similar way to build all these concepts from the Android SDK.
Having this in mind, IntentBuilder represents the perfect solution I was looking for.
Icepick
Another “must-have library”, quoted frequently in listings!
It aims at simplifying the way to save and restore the state of activities and fragments.
It provides very clear annotations and a powerful utility class named Icepick.
OnActivityResult
Another boilerplate code often written by an Android developer concerns the “OnActivityResult” part.
We have to override the onActivityResult method, test the request code, test the result code, and here we can deal with the result. We usually fall in a lot of nested blocks, difficult to read and understand.
This library provides a relevant answer to this issue.
With the simple @OnActivityResult annotation and its parameters, placed up above a method declaration, we can clearly specify the method to call in which case of activity result.
The code is definitely lighter and clearer.
Project Lombok
It’s a famous Java project to reduce the boilerplate Java code. The developer writes less code, so it’s less error-prone and easier to read.
In an Android project, using Android Studio, it should be used in combination with the associated plugin:
A new way to set up ListView/RecyclerView: Smart Adapters
- Smart Adapters:
The advantages I see:
- No need to write the redundant code of an adapter with its
getCountmethods and so on - A dedicated class to manage the view to display to, that has more meaning that adapter one for me
- No more hand-handling of the ViewHolder pattern
- An easy binding in few lines in the worker class
- Works well with Butter Knife
- A fully-customizable listener engine
- A powerful way to custom binding of a given Model class to many View class, delegating responsibility to choose right View to a dedicated Builder class
The drawbacks I see:
- Currently not working with
Cursor
An alternative: generics, Cursor, Michelangelo and MicroOrm
It’s possible to write a generic Adapter class in the same way it’s presented in this repository:
It’s possible to turn it so that it can manage a Cursor.
Here comes a powerful library to inflate and bind View: Michelangelo.
Now, an easy way to retrieve values from a Cursor could be to use of the MicroOrm library (as you can see in a previous section).
Welcome to a Lambda Expressions world from Java 8 thanks to Retrolambda
A major contribution of Java 8 is the lambda expressions.
It’s like the closures of languages such as Groovy or Scala for example. The idea is to provide a reference mechanism to write anonymous code blocks.
In functional languages, this feature is very useful. For example, it allows developers to pass a function “B” as a parameter of a function “A”, making this “A” function reusable and easy to test.
To do so similar technique in Java, we often have to declare an interface “B” and provide an anonymous implementation to the function “A”. Quite verbose (and boring)!
Lambda expressions provide an attractive alternative since it simplifies the use of interfaces with a single abstract method (i.e., “SAM interfaces” or “Functional Interfaces”), such as Runnable, Comparator and multiple listeners in the Android SDK.
It has a very fluent syntax:
(parameters) -> simple statement

// or

(parameters) -> { statements block }
In my Android projects, I use it to significantly reduce the size of my source code. Each time I have to deal with a SAM interface, I can use a lambda expression. By the way, it’s frequent that Android Studio advises me to replace my code with a lambda expression!
To do so, I have to include Gradle Retrolambda Plugin to my project.
Here is a snippet of me build.gradle file:
buildscript {
    repositories {
        mavenCentral()
    }
    dependencies {
        // ...
        classpath 'me.tatarka:gradle-retrolambda:3.2.5'
    }
}

repositories {
  mavenCentral()
}

// ...
apply plugin: 'me.tatarka.retrolambda'

android {

    // ...

    compileOptions {
        sourceCompatibility JavaVersion.VERSION_1_8
        targetCompatibility JavaVersion.VERSION_1_8
    }
}

retrolambda {
    jvmArgs '-noverify'
}
And here we are!
Simplify the logic to switch between LCE views
LCE is an acronym (I knew thanks to the Mosby articles) to describe the traditional Loading-Content-Error views an Activity or Fragment could manage. I just would like to add the Empty view keyword.
It’s a common task to switch from one View to another according to user interactions and/or jobs execution. It could easily become a complex lot of methods with boolean parameters to represent the view state. Not easy to set up and not easy to read when coming back to the project a few months later.
I looked for various approaches to simplify this (error-prone) task. And a relevant answer I found is the use of the Switcher library.
It’s very simple to set up. Just declare your widgets in layouts, as usual.
And in your activity or fragment class, you build a new instance of Switcher.
You set up the various views it has to play with:
switcher = new Switcher.Builder(this)
                .addContentView(findViewById(R.id.recycler_view)) // content member
                .addErrorView(findViewById(R.id.error_view)) // error view member
                .addProgressView(findViewById(R.id.progress_view)) // progress view member
                .addEmptyView(findViewById(R.id.empty_view)) // empty placeholder member
                .build();
And then you just have to call the suitable method when needed:
switcher.showContentView();
switcher.showProgressView();
switcher.showErrorView();
switcher.showEmptyView();
And here you gain a fluent way to play with your views visibility and have a consistent view state machine.
Testing
The first step to write unit tests on Android is to set up our build.gradle file to be able to use JUnit and its AndroidJUnitRunner and write JUnit 4.x tests.
To do so, we follow the documentation from the Android Testing Support Library
So our build.gradle looks like:
android {
    // ...

    defaultConfig {
        // ...

        testInstrumentationRunner "android.support.test.runner.AndroidJUnitRunner"
    }
    // ...
}

dependencies {
    androidTestCompile 'com.android.support:support-annotations:23.1.1'
    androidTestCompile 'com.android.support.test:runner:0.4.1'
    androidTestCompile 'com.android.support.test:rules:0.4.1'
}
The support-annotations allows us to use JUnit specific annotations to configure the test run.
This way, we can define JUnit 4.x tests like:
@RunWith(AndroidJUnit4.class)
@LargeTest
public class TestClass {

    //region Test lifecycle
    @Before
    public void setUp() {
    }

    @After
    public void tearDown() {
    }
    //endregion

    //region Test methods
    @Test
    public void testMethod() {
        // TODO write test
    }
    //endregion
}
Write tests the BDD way
A trend I love when writing tests is to use the “given/when/then” canvas. The result is an organized writing of test methods, following a specific requirement that can serve as technical documentation.
That’s why I wonder “how to write better unit tests for my Android projects?”
A first answer I found was to use Java labels such as:
public void test_A_Test_Method() throws IOException {
    Given:
    {
        // 'given' statements
    }

    When:
    {
        // 'when' statements
    }

    Then:
    {
        // 'then' statements
    }
}
Nothing special, except the structure of the tree steps of this canvas to three “blocks” of Java code, prefixed with specific labels.
Another tool I came with is the very attractive Frutilla.
![]()
The idea is to describe the tests in plain text thanks to Java annotations, as follows:
@RunWith(value = org.frutilla.FrutillaTestRunner.class)
public class FrutillaExamplesWithAnnotationTest {

    @Frutilla(
        Given = "a test with Frutilla annotations",
        When = "it fails due to an error",
        Then = "it shows the test description in the stacktrace"
    )
    @Test
    public void testError() {
        throw new RuntimeException("forced error");
    }

}
The first benefit is that the test method explains itself in a specific use case. Next, when a test fails, the stack trace becomes very clear and describes precisely the failing use case.
Fluent assertions
To make it easier to write tests, I like to use third-party libraries that provide fluent API, such as:
- Truth: http://google.github.io/truth/
- AssertJ: http://joel-costigliola.github.io/assertj/assertj-core.html
Where developers formerly wrote:
import static org.junit.Assert.assertTrue;

Set<Foo> foo = ...;
assertTrue(foo.isEmpty());
then now can write:
import static com.google.common.truth.Truth.assertThat;

Set<Foo> foo = ...;
assertThat(foo).isEmpty();
The first advantage is that it makes tests easier to read. Another one is that the failure messages are more meaningful.
Square also released a library to write specific assertions to Android views:
- AssertJ Android: http://square.github.io/assertj-android/
Mocking
To mock the behavior of some components of my projects, I use the Mockito library.
![]()
Considering I’m in a Multidex project, I have to configure my build.gradle as follows:
    androidTestCompile 'org.mockito:mockito-core:1.10.19'
    androidTestCompile 'com.google.dexmaker:dexmaker-mockito:1.2'
For example, I wanted to mock my image loader component (in this case, I use Picasso). So I mocked this component and its Dagger2 module as follows:
    private final Picasso mPicasso = mock(Picasso.class);
    private final PicassoModule mPicassoModule = mock(PicassoModule.class);

    public Picasso getPicasso() {
        return mPicasso;
    }
So when starting UI testing, this code allows me to mock the behavior of Picasso. Afterwards I can check the calls that were made to this component, thanks to Mockito’s API:
verify(mModuleRest.getPicasso(), times(1)).load("a test url");
Other well-known mocking libraries are commonly used across the Android ecosystem. Just to quote them:
- Robolectric: http://robolectric.org/
![]()
- PowerMock: https://github.com/jayway/powermock
![]()
UI testing
Another well-known testing library is Robotium. It’s very powerful to describe and run UI tests.
![]()
To set it up, we have to use it in combination with the ActivityTestRule. This one allows us to write tests concerning an Android Activity. Then we get this Activity to configure our Solo instance. This Solo class is the entry point of the Robotium tool. This class provides a wide set of methods to reproduce the user behavior.
To make it easier to write Robotium test cases, I wrote an abstract and generic test class:
public abstract class AbstractRobotiumTestCase<TypeActivity extends Activity> {
    //region Rule
    @Rule
    public final ActivityTestRule<TypeActivity> mActivityTestRule;
    //endregion

    //region Fields
    protected Solo mSolo;
    protected TypeActivity mActivity;
    protected Context mContextTest;
    protected Context mContextTarget;
    //endregion

    //region Constructor
    protected AbstractRobotiumTestCase(final ActivityTestRule<TypeActivity> poActivityTestRule) {
        mActivityTestRule = poActivityTestRule;
    }
    //endregion

    //region Test lifecycle
    @Before
    public void setUp() throws Exception {
        mActivity = mActivityTestRule.getActivity();
        mSolo = new Solo(InstrumentationRegistry.getInstrumentation(), mActivity);
        mContextTest = InstrumentationRegistry.getContext();
        mContextTarget = InstrumentationRegistry.getTargetContext();
    }

    @After
    public void tearDown() throws Exception {
        mSolo.finishOpenedActivities();
    }
    //endregion
}
So now, to add a new test case for a specific Activity, I just have to subclass this AbstractRobotiumTestCase as follows:
@LargeTest
public class TestMyCustomActivity extends AbstractRobotiumTestCase<MyCustomActivity> {

    //region Constructor matching super
    public TestMyCustomActivity() {
        super(new ActivityTestRule<>(MyCustomActivity.class, true, false));
    }
    //endregion

    //region Test lifecycle
    @Before
    @Override
    public void setUp() throws Exception {
        super.setUp();

        // set up statements
    }

    @After
    @Override
    public void tearDown() throws Exception {
        super.tearDown();

        // tear down statements

        if(mActivity != null) {
            mActivity.finish();
        }
    }
    //endregion

    //region Test methods
    @Test
    public void test_A_Test_Method() {
        Given:
        {
            // 'given' statements
            mActivity = mActivityTestRule.launchActivity(null);
        }

        When:
        {
            // 'when' statements
        }

        Then:
        {
            // 'then' statements
        }
    }
}
I pass false as the third parameter to the ActivityTestRule constructor so it doesn’t start the activity by default. Then, I launch the activity at the end of my “given” block, after all the initializations I need.
By calling mActivityTestRule.launchActivity(null), I notify the test rule to build the default Intent (thanks to the null parameter) and start it. It returns an instance of the started activity.
Combination with dependency injection
A point of interest for us is to turn off some features and replace them with mocks when running our tests. Thanks to Dagger2, it becomes easy to do so.
First, let’s have a look to my Application subclass:
@AutoComponent(
        modules = {
                ModuleAsync.class,
                ModuleBus.class,
                ModuleContext.class,
                ModuleDatabase.class,
                ModuleEnvironment.class,
                ModuleRest.class,
                ModuleTransformer.class
        }
)
@Singleton
@AutoInjector(ApplicationAndroidStarter.class)
public class ApplicationAndroidStarter extends Application {
    //region Singleton
    protected static ApplicationAndroidStarter sSharedApplication;

    public static ApplicationAndroidStarter sharedApplication() {
        return sSharedApplication;
    }
    //endregion

    //region Component
    protected ApplicationAndroidStarterComponent mComponentApplication;
    //endregion

    // ...

    //region Overridden methods
    @Override
    public void onCreate() {
        super.onCreate();
        sSharedApplication = this;

        buildComponent();

        // ...
    }

    @Override
    public void onTerminate() {
        super.onTerminate();
        sSharedApplication = null;
        // ...
    }
    //endregion

    //region Getters
    public ApplicationAndroidStarterComponent componentApplication() {
        return mComponentApplication;
    }
    //endregion

    //region Protected methods
    protected void buildComponent() {
        mComponentApplication = DaggerApplicationAndroidStarterComponent.builder()
                .moduleAsync(new ModuleAsync())
                .moduleBus(new ModuleBus())
                .moduleContext(new ModuleContext(getApplicationContext()))
                .moduleDatabase(new ModuleDatabase())
                .moduleEnvironment(new ModuleEnvironment())
                .moduleRest(new ModuleRest())
                .moduleTransformer(new ModuleTransformer())
                .build();
    }
    //endregion
}
It’s the entry point where each element asks for its dependencies. Now, the idea is to subclass it in my test project, as follows:
public class MockApplication extends ApplicationAndroidStarter {

    //region Fields
    private ModuleBus mModuleBus;
    private MockModuleRest mModuleRest;
    private ModuleEnvironment mModuleEnvironment;
    //endregion

    //region Singleton
    protected static MockApplication sSharedMockApplication;

    public static MockApplication sharedMockApplication() {
        return sSharedMockApplication;
    }
    //endregion

    //region Lifecycle
    @Override
    public void onCreate() {
        super.onCreate();
        sSharedMockApplication = this;
    }
    //endregion

    //region Overridden method
    @Override
    protected void buildComponent() {
        mModuleBus = new ModuleBus();
        mModuleRest = new MockModuleRest();
        mModuleEnvironment = new MockModuleEnvironment();

        mComponentApplication = DaggerApplicationAndroidStarterComponent.builder()
                .moduleAsync(new ModuleAsync())
                .moduleBus(mModuleBus)
                .moduleContext(new ModuleContext(getApplicationContext()))
                .moduleDatabase(new MockModuleDatabase())
                .moduleEnvironment(mModuleEnvironment)
                .moduleRest(mModuleRest)
                .moduleTransformer(new ModuleTransformer())
                .build();
    }
    //endregion

    //region Getters
    public MockModuleRest getModuleRest() {
        return mModuleRest;
    }

    public ModuleBus getModuleBus() {
        return mModuleBus;
    }

    public ModuleEnvironment getModuleEnvironment() {
        return mModuleEnvironment;
    }
    //endregion
}
Here I need to mock my ModuleRest for example. I can do so thanks to the following code:
@Module
public class MockModuleRest extends ModuleRest {
    //region Fields
    private final MockWebServer mMockWebServer;
    //endregion

    //region Constructor
    public MockModuleRest() {
        mMockWebServer = new MockWebServer();
    }
    //endregion

    //region Modules
    @Override
    public GitHubService provideGithubService(@NonNull final OkHttpClient poOkHttpClient) {
        final Retrofit loRetrofit = new Retrofit.Builder()
                .baseUrl(mMockWebServer.url("/").toString())
                .addConverterFactory(JacksonConverterFactory.create())
                .build();
        return loRetrofit.create(GitHubService.class);
    }
    //endregion

    //region Getters
    public MockWebServer getMockWebServer() {
        return mMockWebServer;
    }
    //endregion

    //region Visible API
    public void setUp() {
        mMockWebServer = new MockWebServer();
    }
    //endregion
}
I lean on MockWebServer to queue up mock responses. This way, each time a REST call is made, it will deal with the mock responses I declared.
The next point is: to use this mock application, we should configure our test project. It begins with the creation of a custom AndroidJUnitRunner to declare the Application subclass to use:
public class AndroidStarterTestRunner extends AndroidJUnitRunner {

    //region Overridden method
    @Override
    public void onCreate(final Bundle poArguments) {
        MultiDex.install(this.getTargetContext());
        super.onCreate(poArguments);
    }

    @Override
    public Application newApplication(
            final ClassLoader poClassLoader,
            final String psClassName,
            final Context poContext) throws InstantiationException, IllegalAccessException, ClassNotFoundException {
        return super.newApplication(poClassLoader, MockApplication.class.getName(), poContext);
    }
    //endregion

}
Now, we simply have to change our build.gradle file to point to his AndroidJUnitRunner:
android {
    // ...

    defaultConfig {
        // ...

        testInstrumentationRunner "fr.guddy.androidstarter.tests.runner.AndroidStarterTestRunner"
    }
Finally, in our test case, we can queue up mock responses as follows:
public class ATestCase {

    //region Fields
    private MockModuleRest mModuleRest;
    //endregion

    //region Test lifecycle
    @Before
    @Override
    public void setUp() throws Exception {
        // ...

        // get the mock REST module
        mModuleRest = MockApplication.sharedMockApplication().getModuleRest();
    }

    @After
    @Override
    public void tearDown() throws Exception {
        super.tearDown();
        try {
            mMockWebServer.shutdown();
        } catch (final Exception loException) {
            loException.printStackTrace();
        }
    }
    //endregion

    //region Test methods
    @Test
    public void test_A_Test_Method() {
        Given:
        {
            final String lsSpecificJSONData = /* specific JSON data*/;
            final MockResponse loMockResponse = new MockResponse().setResponseCode(/* HTTP status code */);
            loMockResponse.setBody(lsSpecificJSONData);
            mModuleRest.getMockWebServer().enqueue(loMockResponse);
            try {
                mMockWebServer.start(/* the mock web server port */);
            } catch (final Exception loException) {
                loException.printStackTrace();
            }
            // 'then' statements
        }

        When:
        {
            // 'when' statements
        }

        Then:
        {
            // 'then' statements
        }
    }
}
This example is focused on REST communications, but it can be applied to various layers such as persistence for example.
Moreover, the example shown queues up only one mock response, but it becomes possible to add multiple responses to build more complex scenarios.
Code coverage
Android SDK comes with Emma Code Coverage. We can activate the code coverage in the build.gradle file, as follows:
android {
   buildTypes {
      debug {
         testCoverageEnabled = true
      }
   }
}
Running the gradle tasks command, we can see:
createDebugCoverageReport - Creates test coverage reports for the debug variant.
So to get the code coverage report, we need to run this Gradle task createDebugCoverageReport:
gradle createDebugCoverageReport
Now we can find the report in the {main_module}/build/reports/coverage/debug directory. We just need to open the index.html file in a Web browser to view the report.
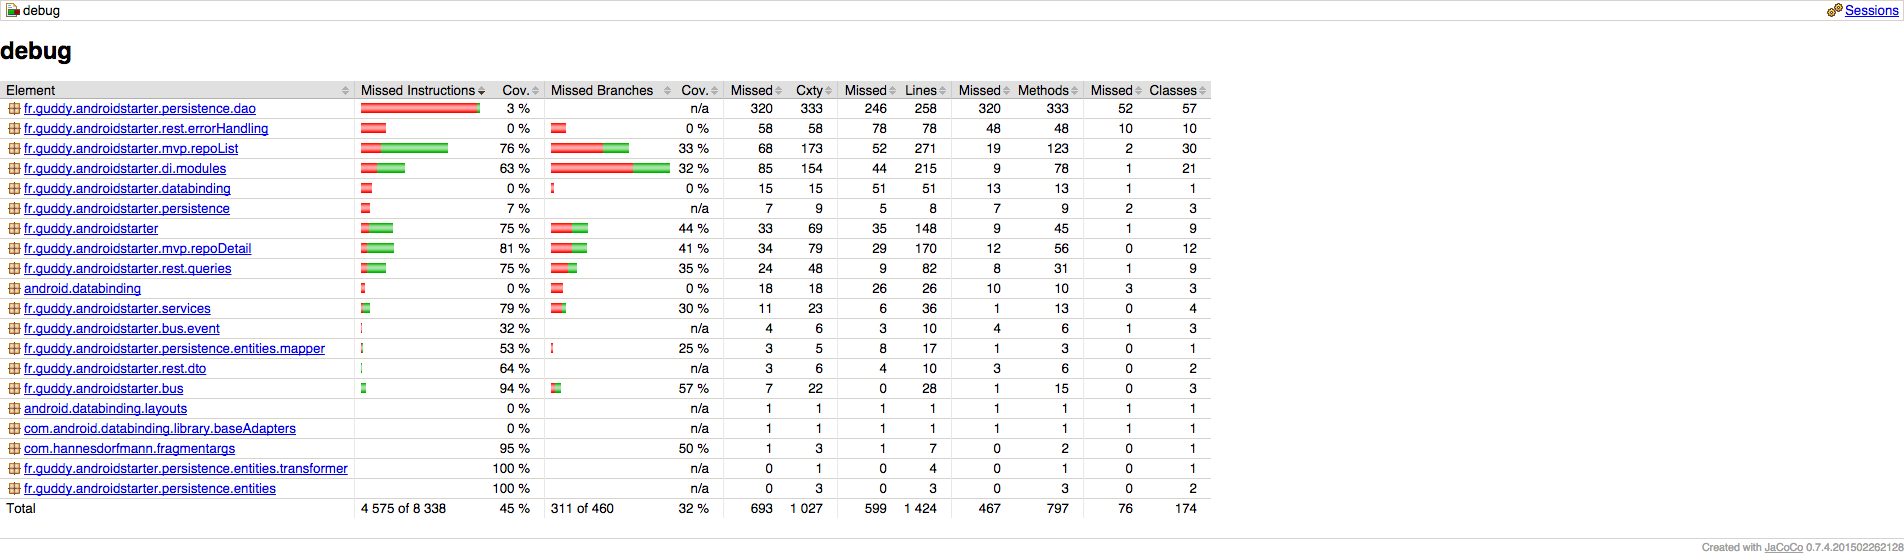
Code quality
A great article about this topic was written by Vincent Brison: “How to improve quality and syntax of your Android code”. In this article, some useful tools are listed:
Vincent Brison shows us how to combine and use them with Gradle.
First, we can go to the associated repository and copy the config at the root level of our project.
Then, we just have to add the following line in our app/build.gradle file:
apply from: '../config/quality.gradle'
Finally, when running the gradle check command at the project root level, it automatically runs these tools, producing associated reports in the app/build/reports folder.
Relevant libraries
-
Arrow:
Arrow is a Lightweight library toolbox for Java and Android Development.

-
Paperwork
Generate build info for your Android project without breaking incremental compilation
-
Logger
-
hugo
-
Frodo
Android Library for Logging RxJava Observables and Subscribers.
-
Lynx
Lynx is an Android library created to show a custom view with all the information Android logcat is printing, different traces of different levels will be rendered to show from log messages to your application exceptions.
-
FluentView
Android Library for Setting a View via Fluent Interface

-
AndroidDevMetrics
Performance metrics library for Android development.
Relevant tools
-
Scalpel
A surgical debugging tool to uncover the layers under your app.
-
LeakCanary
A memory leak detection library for Android and Java.
-
DebugDrawer
Android Debug Drawer for faster development
-
Android Asset Studio
-
Fabric
-
Vector Asset Studio
Vector Asset Studio helps you add material icons and import Scalable Vector Graphic (SVG) files into your app project as a drawable resource.
Relevant resources
- Android Arsenal
- androidweekly
- Gradle tips & tricks
- RxAndroidLibs
- AndroidLibs
Bibliography
- Android DataBinding
- Code coverage
- Dagger2
- http://fernandocejas.com/2015/04/11/tasting-dagger-2-on-android/
- https://blog.gouline.net/2015/05/04/dagger-2-even-sharper-less-square/
- http://code.tutsplus.com/tutorials/dependency-injection-with-dagger-2-on-android--cms-23345
- https://www.future-processing.pl/blog/dependency-injection-with-dagger-2/
- Networking
- Retrolambda
- RxJava
- Testing