Little stories about an iOS application architecture in Swift
![]()
By writing this paper, my goal is to describe how I came up with the iOS app architecture I suggest. It’s a step by step writing to follow the reasons bringing me to set up the different components I chose.
The aim of the template application is very simple: it’s a master/detail application to present a list of GitHub repositories of a given user. Although it’s simple, it gathers some classical jobs when writing an application:
- consume a REST API
- save data to a local storage
- load data from this local storage
- architecture the logical layer and navigation between screens
Let’s discover what’s hiding under the hood!
Dependency management
To manage the dependencies to various tools and libraries our project will rely on, I chose to use CocoaPods .
![]()
First of all, I had to install it via:
$ sudo gem install cocoapods
Then I ran the following command in the root directory of the project:
$ pod init
It creates the corresponding file named Podfile, where to put the dependencies.
Just describe each one in the following way:
platform :ios, '8.0'
use_frameworks!

target 'MyApp' do
  pod '', '~> '
end
Then running
$ pod install
will download each one in the Pods directory.
Then, the project must be opened thanks to the following command line:
open .xcworkspace
Consuming REST API
REST Client
To achieve HTTP networking in Swift, I chose to use one of the most popular libraries: Alamofire.
![]()
Alamofire
- is very complete
- has a fluent API
- is very well unit tested and documented
- has a cURL debug output (very nice tip)
Coming from a world of Android and Retrofit, I love a clean API service definition in a dedicated file.
Following the Alamofire documentation, we can see, in the CRUD & Authorization section, that it’s possible to define a Swift enum with methods matching the API service.
This enum must extend the URLRequestConvertible protocol.
What we’ve got is a clean, readable, maintainable file bringing together all the needed API call methods, such as:
import Alamofire

enum ApiService: URLRequestConvertible {
    static let baseURLString = "https://api.github.com"

    // MARK: API methods definitions

    case ListRepos(user: String, sort: ListReposSort?);

    // MARK: Parameters values for API methods

    enum ListReposSort {
        case DESC;
        case ASC;
        var value: String {
            switch self {
            case .ASC:
                return "asc";
            case .DESC:
                return "desc";
            }
        }
    }

    // MARK: Verb definition according to API method

    var method: Alamofire.Method {
        switch self {
        case .ListRepos:
            return .GET;
        }
    }

    // MARK: Path definition according to API method

    var path: (lastSegmentPath: String, parameters: [String: AnyObject]?) {
        switch self {
        case .ListRepos(let user, let sort) where sort != nil:
            return ("/users/\(user)/repos", ["sort": sort!.value]);
        case .ListRepos(let user, _):
            return ("/users/\(user)/repos", nil);
        }
    }

    // MARK: URLRequestConvertible

    var URLRequest: NSMutableURLRequest {
        let URL = NSURL(string: ApiService.baseURLString)!;
        let mutableURLRequest = NSMutableURLRequest(URL: URL.URLByAppendingPathComponent(path.lastSegmentPath));
        mutableURLRequest.HTTPMethod = method.rawValue;
        let encoding = Alamofire.ParameterEncoding.URL;

        return encoding.encode(mutableURLRequest, parameters: path.parameters).0;
    }
}
Now just use it with Alamofire as follows:
Alamofire.request(ApiService.ListRepos(user: "RoRoche", sort: ApiService.ListReposSort.DESC))
Here we have in a single file:
- the API base URL
- the available methods
- for each method, its parameters and the way to build its path
- for each method, the HTTP Verb to use
The way to use it could vary according to the developer’s philosophy or/and needs:
- it could be a “resource-oriented” file (such as in AngularJS
resourcesconcept ; such as in Alamofire CRUD section of documentation) - it could distinguish authentificated calls
- an enum file could correspond to one API method
- etc.
Conclusion: at this step, we have an elegant way to define REST API calls.
But now, we have to consider dealing with the data obtained via the API. Here is the moment to talk about how to parse data (JSON content in this case).
Parsing data
To parse JSON data, I chose to use ObjectMapper. It’s a well-known library in the Swift ecosystem.
The reason why I chose this one is for the following features:
- it has a two-way binding between JSON and objects
- it can deal with nested objects
- it manages subclasses
- it manages generic objects
- it has ability to transform input data to specific outputs
A classor struct simply has to respond to Mappable protocol by implementing:
    init?(_ map: Map)
    mutating func mapping(map: Map)
So it’s possible to define variables with a given name to map a JSON key with a different name (could be convenient for specific needs).
First, I define the data model to parse: here, a Repo class such as:
class Repo {
    var id: Int?;
    var name: String?;
    var owner: String?;
    var avatarUrl: String?;
    var desc: String?;
    var createdAt: String?;
    var gitUrl: String?;
    var cloneUrl: String?;
}
Then, I make it respond to the Mappable protocol thanks to the following code:
    required init?(_ map: Map) {
    }

    func mapping(map: Map) {
        id          <- map["id"];
        name        <- map["name"];
        owner       <- map["owner.login"];
        avatarUrl   <- map["owner.avatar_url"];
        desc        <- map["description"];
        createdAt   <- map["created_at"];
        gitUrl      <- map["git_url"];
        cloneUrl    <- map["clone_url"];
    }
Here is the ObjectMapper specific code. After that, the code to call the REST API through Alamofire and parse the results is the following:
        Alamofire.request(ApiService.ListRepos(user: user, sort: ApiService.ListReposSort.DESC))
            .responseJSON { response in
                if let JSON = response.result.value {
                    let repos = Mapper<Repo>().mapArray(JSON);
                    // deal with result
                }
        }
Now, a very personal point of view: I love separating logical layers to specific files/classes. Here we have two concepts:
- on the one hand, a very simple object model, just defining variables
- on the other hand, a specific mapping job responding to a peculiar protocol, with a dedicated method
That’s where I’d like to introduce the Swift extensions (powerful and interesting) concept. It relies on the ability to add a behavior (i.e., functions) to a given class. Luckily, just what I described before!
So, I decided to create a new Swift file named RepoDTO.swift (the “DTO” notation references the DTO pattern commonly used in Web projects). It declares the extension Repo and declares the response to the Mappable protocol.
It just contains the implementation of the mapping(map: Map) function. I’d like to include the Mappable.init but such a required initializer must be located inside the original class.
I know that it’s typically a point of discussion:
- some developers prefer to view all the API of a class in a single file
- personally, I like to decouple logical segments in dedicated files to write lesser but more meaningful files
I guess the introduction of CoreData concepts and code generation would show that it can be helpful to maintain such dedicated files, instead of fighting with diff tools to revert these “custom” code segments.
Considering Xcode organization advantages: it allows us to create groups matching the following logic:
	|_
		|_	Model
			|_	Repo.swift
		|_ REST
			|_	ApiService.swift
			|_ DTO
				|_	RepoDTO.swift
N.B.: An extension is provided (AlamofireObjectMapper) to use ObjectMapper to convert Alamofire responses.
Managing jobs
Here we have the requests to a remote API and its parsing working. We could want to add an abstraction layer to isolate these two specific jobs in a single class.
That’s why I decided to use SwiftTask.
To demonstrate how to use it, I first created a specific class to perform the REST call and the parsing.
I called it QueryListRepos and made it extend Task<Void, Array<Repo>, NSError>.
Now the deal is to configure it in its init using the InitClosure type.
The init method takes a String parameter corresponding to the user we are looking for.
In the InitClosure, we define the expected behavior as follows:
let initClosure: InitClosure = { progress, fulfill, reject, configure in

    let request = Alamofire.request(ApiService.ListRepos(user: user, sort: ApiService.ListReposSort.DESC))
        .responseJSON { response in

            if(response.result.error != nil) {
                reject(response.result.error!);
            } else {
                if let JSON = response.result.value {
                    // JSON parsing
                    let repos: Array<Repo> = Mapper<Repo>().mapArray(JSON)!;

                    // finish with success
                    fulfill(repos);
                } else {
                    // finish with error
                    let error: NSError = NSError(domain: "JSON parsing", code: 0, userInfo: [:]);
                    reject(error);
                }
            }
    }

    debugPrint(request);

    // we plug the cancel method of the Task to the cancel method of the request
    configure.cancel = {
        request.cancel();
    }
};
Then we just have to call the super.init method in the following manner:
super.init(weakified: false, paused: false, initClosure: initClosure);
And here we are: everywhere from the project, we can start this HTTP request and JSON parsing simply by writing:
let task = QueryListRepos(user: "a given user")
Now we can set up the success and failure callbacks for this task. A valuable advantage is that we can configure these callbacks inside the init method of the task, and after starting it in the considered component.
- In the task
initfunction:
class QueryListRepos: Task<Void, Array<Repo>, NSError> {
    init(user: String!) {
        let initClosure: InitClosure = { progress, fulfill, reject, configure in
            // ...
        };

        super.init(weakified: false, paused: false, initClosure: initClosure);

        self.success { (value: Array<Repo>) -> Void in
            print("[QueryListRepos:init] task success");
        }.failure { (error: NSError?, isCancelled: Bool) -> Void in
            print("[QueryListRepos:init] task failure");
        }
    }
}
- In the view controller:
let task = QueryListRepos(user: user);
task.success { (value: Array<Repo>) -> Void in
    print("[ViewController:listRepos] task success");
}.failure { (error: NSError?, isCancelled: Bool) -> Void in
    print("[ViewController:listRepos] task failure");
}
It provides the following output:
[QueryListRepos:init] task success
[ViewController:listRepos] task success
The conclusion is: we can handle success/failure at task level (for a generic purpose for example) and in the starter component (for specific jobs ; in a view controller for example).
Communication between components with passing data
A typical example of a generic purpose that could be achieved in success/failure callbacks at task level is to fire a NSNotification to notify other components that the task is complete.
The NSNotification concept in iOS is interesting by itself. Through the NSNotificationCenter, it becomes possible to communicate between various components in a same application, and transmit data to observer(s).
Personally, I have been using it for many years now. Nevertheless, I’d like to have a more fluent syntax to set up my notifications and their observer(s). To solve this point, I found the following library: Kugel.
![]()
Just what I need:
- a wrapper to easily publish a notification,
- to subscribe to one or more notifications at the same time
- and unsubscribe from all notifications in one line.
Simple, effective.
So I’ve just defined an abstract class to encapsulate a common job for a termination query event.
Here is the code:
public class AbstractQueryNotification {

    private struct UserInfo {
        static let Results: String = "results";
        static let Error: String = "error";
        static let IsCancelled: String = "isCancelled";
    }

    public class func buildUserInfoSuccess<T where T: AnyObject>(results: T) -> [NSObject: AnyObject] {
        let userInfo: [String: AnyObject] = [
            UserInfo.Results:results
        ];

        return userInfo;
    }

    public class func buildUserInfoFailure(error: NSError, isCancelled: Bool) -> [NSObject: AnyObject] {
        let userInfo: [String: AnyObject] = [
            UserInfo.Error: error,
            UserInfo.IsCancelled: isCancelled
        ];

        return userInfo;
    }

    private class func getUserInfoForKey<T>(notification: NSNotification, key: String) -> T? {
        let userInfo: [NSObject: AnyObject] = notification.userInfo as [NSObject: AnyObject]!;

        var ret: T? = nil;

        if let value = userInfo[key] {
            ret = value as? T
        }

        return ret;
    }

    public class func results<T>(notification: NSNotification) -> T? {
        return getUserInfoForKey(notification, key: UserInfo.Results);
    }

    public class func error(notification: NSNotification) -> NSError? {
        return getUserInfoForKey(notification, key: UserInfo.Error);
    }

    public class func isCancelled(notification: NSNotification) -> Bool? {
        return getUserInfoForKey(notification, key: UserInfo.IsCancelled);
    }
}
It provides an elegant facade to build notifications and retrieve user’s info thanks to the helper method.
Now, in the success/failure callbacks at task level, I’ve just to call the following:
self.success { (value: Array<Repo>) -> Void in
    let userInfo: [NSObject: AnyObject] = OnQueryListReposDidFinish.buildUserInfoSuccess(value as AnyObject);
    Kugel.publish(OnQueryListReposDidFinish.Name, object: self, userInfo:userInfo);
}.failure { (error: NSError?, isCancelled: Bool) -> Void in
    let userInfo: [NSObject: AnyObject] = OnQueryListReposDidFinish.buildUserInfoFailure(error!, isCancelled: isCancelled);
    Kugel.publish(OnQueryListReposDidFinish.Name, object: self, userInfo:userInfo);
}
Finally, just register a component (here, for example, a view controller) to be notified, in the following way:
class /*MyCustom*/ViewController: /*Super*/ViewController/*, */ {

    // ...

    // MARK: - Lifecycle

    override func viewDidLoad() {
        super.viewDidLoad()

        // ...

        Kugel.subscribe(self, name: OnQueryListReposDidFinish.Name, selector: "onQueryListReposDidFinish:");
    }

    deinit {
        Kugel.unsubscribeAll(self);
    }

    // MARK: - Notifications management

    func onQueryListReposDidFinish(notification: NSNotification) {
        let query: QueryListRepos = notification.object as! QueryListRepos;
        let results: Array<Repo>? = OnQueryListReposDidFinish.results(notification);
        let error: NSError? = OnQueryListReposDidFinish.error(notification);
        let isCancelled: Bool? = OnQueryListReposDidFinish.isCancelled(notification);

        // TODO: deal with notification
    }

    // ...
}
After that, a component can be notified and can handle data passing through the notification (and don’t forget to unregister itself in the deinit method).
Data persistence
The entry point of the local storage is to use the built-in tool provided by Apple: CoreData.
It provides a powerful system of storage, a user-friendly interface to declare model and automatic code generation.
Nevertheless, developers can expect another layer of abstraction in order to provide a fluent API and clear method calls to simplify daily work and delete boilerplate code.
Final choice: CoreStore
Various libraries exist to provide a nice solution to my previously mentioned problem:
I’ve decided to use CoreStore since it has very complete features and its API is fluent as well (a single line produces a set of coherent operations).
After declaring the entities in the traditional way (i.e., using .xcdatamodel file and generating NSManagedObject), I can set up CoreStore.
First, I define a singleton class to manage the DataStack object from CoreStore. I simply use it in its default configuration. The code is the following:
import CoreStore

final class DataStoreManager: NSObject {

    // MARK: - Singleton set up

    static let sharedInstance = DataStoreManager();

    private override init() {
        super.init();

        // This prevents others from using the default '()' initializer for this class.

        self.synthesizeDataStoreManager();
    }

    // MARK: - CoreStore specific job

    private static let fileName: String = "POC.sqlite";

    let dataStack = DataStack();

    private func synthesizeDataStoreManager() {
        try! self.dataStack.addSQLiteStoreAndWait(fileName: DataStoreManager.fileName);
    }
}
Then, I edit the QueryListRepos class so that, after parsing the JSON data, we store it in the DataStack as follows:
DataStoreManager.sharedInstance.dataStack.beginSynchronous({ (transaction) -> Void in
    let deleted: Int = transaction.deleteAll(From(Repo))!;

    for repoDto: RepoDTO in repos {
        let repo: Repo = transaction.create(Into(Repo));
        repo.populateWithDto(repoDto);
    }

    transaction.commit();
});
And finally, I can retrieve these data from the database through the following call:
DataStoreManager.sharedInstance.dataStack.beginAsynchronous { (transaction) -> Void in
    let repos: Array<Repo> = transaction.fetchAll(From(Repo))!;
    // deal with data...
}
Make thinner view controllers
One of the most common issues in iOS development is a view controller becoming more and more massive.
Especially, when using a UITableView, the view controller inflates hugely (considering dataSource and delegate methods).
There already are articles talking about techniques to refactor code of view controllers:
- https://www.objc.io/issues/1-view-controllers/lighter-view-controllers/
- http://clean-swift.com/refactoring-table-view-data-source-and-delegate-methods/
Another way to slim it down is to focus on business (specific) code and to delegate the boilerplate code to a useful library: Hakuba.
The main idea is to remove the UITableViewDataSource and UITableViewDelegate protocols from our view controller.
An instance of Hakuba will do this job for us.
But we have to configure this instance so that it can achieve this goal.
First, as usual, we will have to define a UITableViewCell subclass with its corresponding .xib file. But this time, it has to subclass MYTableViewCell.
The next step is to define a model class that extends MYCellModel. Here we want to display a label and load an image from a remote URL. So, our model is the following:
class RepoCellModel : MYCellModel {
    let avatarUrl: String;
    let name: String;

    init(
        avatarUrl: String,
        name: String,
        selectionHandler: MYSelectionHandler) {

            self.avatarUrl = avatarUrl;
            self.name = name;

            super.init(cell: RepoCell.self, height: 57, selectionHandler: selectionHandler)
    }
}
And our cell just has to override the configureCell function as follows:
class RepoCell: MYTableViewCell {

    @IBOutlet weak var imageViewAvatar: UIImageView!
    @IBOutlet weak var labelName: UILabel!

    override func configureCell(cellModel: MYCellModel) {
        super.configureCell(cellModel);

        if let repoCellModel: RepoCellModel = (cellModel as? RepoCellModel) {

            imageViewAvatar.kf_setImageWithURL(NSURL(string: repoCellModel.avatarUrl)!,
                placeholderImage: UIImage(named: "Git_icon"),
                optionsInfo: [.Transition(ImageTransition.Fade(1))]
            );

            imageViewAvatar.kf_showIndicatorWhenLoading = true;

            labelName.text = repoCellModel.name;

        }
    }
}
N.B.: here we use the popular and powerful Kingfisher library to download image from a remote URL.
In fact, here is just what I could call a “good practice” for code structure with a relevant template of “MV” part of the “MVC” pattern.
But now come the great benefits of Hakuba: let’s go into the view controller.
The first point is that we don’t have to subclass the UITableViewController and override the dataSource and delegate methods anymore.
We just define an outlet for our table view. To populate it, we simply define, for each row to display, an instance of our RepoCellModel and set it to the main section of our table view thanks to the Hakuba instance. Here is the code:
func resetRepoCellModels() {
    var cellModels: Array<RepoCellModel> = Array<RepoCellModel>();

    for repo: Repo in self.data {
        let cellModel: RepoCellModel = RepoCellModel(avatarUrl: repo.avatarUrl!, name: repo.name!) { _ in
            print("on click item");
        };

        cellModels.append(cellModel);
    }

    self.hakuba[0].reset(cellModels)
        .slide(.Fade);
}
Conclusion: the rows are displayed in our table view with a nice fade transition and the click event is managed by Hakuba, calling the selection handler we’ve defined.
Target met: our view controller is definitely thinner!
The VIPER architecture
Key concepts to grasp in this section are the following:
- Single responsability principle
- Test driven development (TDD)
- Behavior driven development (BDD)
- Protocol-Oriented Programming (POP)
This section is mainly based on the following article [https://www.objc.io/issues/13-architecture/viper/].
But what is VIPER?
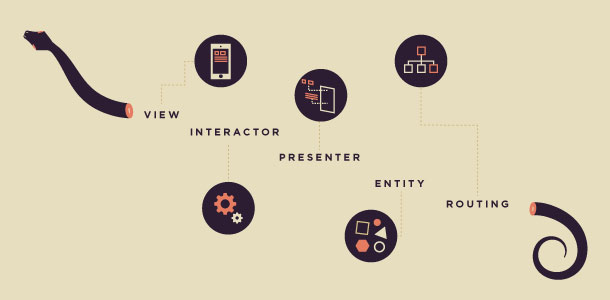
VIPER is an application of Clean Architecture to iOS apps. The word VIPER is a backronym for View, Interactor, Presenter, Entity, and Routing.
The first assessments we could establish after looking at Apple’s ViewController design are the following:
- It has multi responsibility (data sourcing, delegation, view interaction, data presentation).
- Commonly, it is business logic in developers’ mind.
- It’s tightly coupled to the view (it manages a specific lifecycle).
Leading to a massive file that is very difficult (impossible?) to test.
It’s commonly hard to understand and review the code of these classes.
The main idea of the clean architecture is to structure the code to distinguish:
- the framework we are leaning on,
- the UI we present to the end user,
- the external entities (coming from a remote server for example).
Following these principles, the code becomes:
- easy to read,
- easy to understand,
- easy to test,
- easy to maintain.
And thanks to the VIPER architecture, we are now considering a new unmentioned issue: the navigation (the way we are routing between screens).
So, the key concepts to understund concerning VIPER are:
- Module
- It gathers all the VIPER concepts to a specific place that corresponds to a specific use case of the application
- View
- Shows content provided by the presenter
- Catches user’s interactions and notifies it to the presenter
- Presenter
- Knows nothing about the UI but knows the logic to format data to display
- Is notified by the view about actions and dispatch them such as:
- a navigation should start: it asks to the routing (a.k.a. “wireframe”)
- a request should start: it sends this command to the interactor
- Interactor
- Specific job to respond to a single use case
- Requests data managers to load data from network and/or from local storage
- Works with simple objects
- Entities (a.k.a. “data managers”)
- Is called by the interactor, handles the job and encapsulates entities to provide it as a result to the interactor
- Knows if data should be loaded from local storage or from a remote server
- Routing (a.k.a. “wireframe”)
- Is responsible for setting up all the pieces of a given module
- Knows how to navigate from this module
- Is responsible for transitions animations
A convenient way to write a new module is to begin by developing its interactor first, and then the presenter.
It’s very easy to test since we could test each concept independently, and we just have to provide “mock” objects for the concepts it interacts with.
An elegant tool to set up modules easily is “Boa” (https://github.com/team-supercharge/boa). With a simple command line, we can add a new module to our project. It’s pretty much the same as the “Viper Module Generator” (https://github.com/teambox/viper-module-generator). Both are relevant. Both are complementary as well. The first provides a common structure for all the modules, and then the dedicated folders for each module. The second sets up a clear distinction between the local data manager and the API data manager.
I’ll combine these tools by adding a new module using “Boa” and distinguishing data managers in the “Viper Module Generator” way.
Let’s add our first module:
- we go to the root directory of our project
- enter the project directory
- type the following command line to start a “Boa” project:
$ boa init
- fill the form with specific information about the project
- type the following command line to add a specific module
$ vipergen generate ListRepoModule --path=.
- add it to the Xcode project structure (with the “Copy items if needed” checked)
And here we have a clear and clean code structure, providing all we need to develop our use cases.
As a way to communicate between interactors and data stores, I’ll define such “callback” enum:
enum ListRepoModuleLocalDataManagerDeleteReposResult {
    case Success(deleted: NSNumber);
    case Failure(error: NSError);
}
and then declare the function with a callback parameter as follows:
func deleteRepos(user: String, completionHandler: (ListRepoModuleLocalDataManagerDeleteReposResult) -> Void);
That will be called like this:
localDatamanager?.deleteRepos(user) {
    [unowned self](result) -> Void in

    switch(result) {
        case .Success(_):
            self.saveRepos(user, repos: repos, pulledToRefresh: pulledToRefresh);
            break;
        case .Failure(let error):
            self.presenter?.presentError(error);
            break;
        }
    }
Following POP guidelines, we’ll be able to test such piece of code easily by mocking function and providing results.
Unit testing
Let’s talk about testing now. Here I introduced two coupled libraries: Nimble (for fluent assertions API) and Quick (to write tests in a BDD way).
![]()
I’ll present them through a concrete test case of the ListRepoModuleInteractor class.
Thanks to the VIPER architecture, I’ll mock all the surrounding concepts (Presenter, DataManager) to achieve the expected behavior.
So, I begin by writing the skeleton of my test case:
class SpecListRepoModuleInteractor: QuickSpec {

    override func spec() {
        context("if it is the perfect nominal case") {
            it("needs to call all the functions in the scenario") {
                // write assertions
            }
        }
    }

}
First, we must inherit from the QuickSpec class (that itself extends XCTestCase class).
Then, we have to override the spec() function so that our tests are launched. Now we could write the tests in the BDD way (describing the context, the needs and writing the suitable assertions).
Now, we need to mock the playing components. Thanks to the POP, I simply have to respond to the specified protocols.
- The presenter:
class Mock_ListRepoModulePresenter: ListRepoModuleInteractorOutputProtocol {
    init() {}

    var presentLoadingFromNetworkWasCalled: Bool = false;
    var presentLoadingFromNetworkPulledToRefresh: Bool = false;
    func presentLoadingFromNetwork(pulledToRefresh: Bool) {
        presentLoadingFromNetworkWasCalled = true;
        presentLoadingFromNetworkPulledToRefresh = pulledToRefresh;
    }

    var presentLoadingFromDatabaseWasCalled: Bool = false;
    var presentLoadingFromDatabasePulledToRefresh: Bool = false;
    func presentLoadingFromDatabase(pulledToRefresh: Bool) {
        presentLoadingFromDatabaseWasCalled = true;
        presentLoadingFromDatabasePulledToRefresh = pulledToRefresh;
    }

    var presentReposWasCalled: Bool = false;
    var presentReposRepos: Array<Repo> = [];
    var presentReposPulledToRefresh: Bool = false;
    func presentRepos(repos: Array<Repo>, pulledToRefresh: Bool) {
        presentReposWasCalled = true;
        presentReposRepos = repos;
        presentReposPulledToRefresh = pulledToRefresh;
    }

    var presentErrorWasCalled: Bool = false;
    func presentError(error: NSError) {
        presentErrorWasCalled = true;
    }
}
- The API data manager:
class Mock_ListRepoModuleAPIDataManager: ListRepoModuleAPIDataManagerInputProtocol {

    var mockRepos: Array<RepoDTO> = Array<RepoDTO>();
    init() {
        let repo: RepoDTO = RepoDTO();
        repo.id = 1;
        repo.name = "test";

        mockRepos.append(repo);
    }

    var getReposWasCalled: Bool = false;
    var getReposUser: String = "";
    func getRepos(user: String, completionHandler: (ListRepoModuleAPIDataManagerGetReposResult) -> Void) {
        getReposWasCalled = true;
        getReposUser = user;

        // returns mock repos
        completionHandler(ListRepoModuleAPIDataManagerGetReposResult.Success(repos: self.mockRepos));
    }
}
- The local data manager:
class Mock_ListRepoModuleLocalDatamanager: ListRepoModuleLocalDataManagerInputProtocol {
    var mockRepos: Array<Repo> = Array<Repo>();
    init() {
        let repo: Repo = Repo();
        mockRepos.append(repo);
    }

    var deleteReposWasCalled: Bool = false;
    var deleteReposUser: String = "";
    func deleteRepos(user: String, completionHandler: (ListRepoModuleLocalDataManagerDeleteReposResult) -> Void) {
        deleteReposWasCalled = true;
        deleteReposUser = user;
        completionHandler(ListRepoModuleLocalDataManagerDeleteReposResult.Success(deleted: 1));
    }

    var saveReposWasCalled: Bool = false;
    func saveRepos(repos: Array<RepoDTO>, completionHandler: (ListRepoModuleLocalDataManagerSaveReposResult) -> Void) {
        saveReposWasCalled = true;
        completionHandler(ListRepoModuleLocalDataManagerSaveReposResult.Success());
    }

    var getReposWasCalled: Bool = false;
    var getReposUser: String = "";
    func getRepos(user: String, completionHandler: (ListRepoModuleLocalDataManagerGetReposResult) -> Void) {
        getReposWasCalled = true;
        getReposUser = user;

        // returns mock repos
        completionHandler(ListRepoModuleLocalDataManagerGetReposResult.Success(repos: self.mockRepos));
    }
}
And now, the spec function becomes the following:
override func spec() {
    describe("When user asks for loading repos") {
        context("and when it is the perfect nominal case") {
            let interactor: ListRepoModuleInteractorInputProtocol = ListRepoModuleInteractor();
            let presenter: Mock_ListRepoModulePresenter = Mock_ListRepoModulePresenter();
            let APIDataManager: Mock_ListRepoModuleAPIDataManager = Mock_ListRepoModuleAPIDataManager();
            let localDatamanager: Mock_ListRepoModuleLocalDatamanager = Mock_ListRepoModuleLocalDatamanager();

            beforeEach {
                // given
                interactor.presenter = presenter;
                interactor.APIDataManager = APIDataManager;
                interactor.localDatamanager = localDatamanager;

                // when
                interactor.loadRepos("test", pulledToRefresh: false);
            }

            it("needs to call all the functions in the scenario") {
                // then

                // APIDataManager
                expect(APIDataManager.getReposWasCalled).to(beTrue());
                expect(APIDataManager.getReposUser).to(equal("test"));

                // localDatamanager
                expect(localDatamanager.deleteReposWasCalled).to(beTrue());
                expect(localDatamanager.deleteReposUser).to(equal("test"));

                expect(localDatamanager.saveReposWasCalled).to(beTrue());

                expect(localDatamanager.getReposWasCalled).to(beTrue());
                expect(localDatamanager.getReposUser).to(equal("test"));

                // presenter
                expect(presenter.presentLoadingFromNetworkWasCalled).to(beTrue());
                expect(presenter.presentLoadingFromNetworkPulledToRefresh).to(beFalse());

                expect(presenter.presentLoadingFromDatabaseWasCalled).to(beTrue());
                expect(presenter.presentLoadingFromDatabasePulledToRefresh).to(beFalse());

                expect(presenter.presentReposWasCalled).to(beTrue());
                expect(presenter.presentReposRepos).to(equal(localDatamanager.mockRepos));
                expect(presenter.presentReposPulledToRefresh).to(beFalse());

                expect(presenter.presentErrorWasCalled).to(beFalse());
            }
        }
    }
}
And all the assertions pass successfully!
A little note about mocking in Swift is that we could have a look to the following library: https://github.com/mflint/SwiftMock. It’s still under development but it provides a great answer to the traditional mocking and stubbing requirements when writing tests.
Conclusion
All these tools/libraries combined together lead us to a clear, clean, reliable and testable project template where we can add and maintain features (i.e. modules) easily, in a very intelligible way. What we’ve got is a robust arsenal of components that are interchangeable if needed.
Relevant libraries
-
Kingfisher
A lightweight and pure Swift implemented library for downloading and caching image from the web.

-
Async
Syntactic sugar in Swift for asynchronous dispatches in Grand Central Dispatch (GCD)
-
Dollar.swift
A functional tool-belt for Swift Language similar to Lo-Dash or Underscore.js in Javascript http://www.dollarswift.org
-
ExSwift
A set of Swift extensions for standard types and classes.
-
netfox
A lightweight, one line setup, iOS network debugging library!

-
QorumLogs
Swift Logging Utility for Xcode & Google Docs
-
SnapKit
A Swift Autolayout DSL for iOS & OS X http://snapkit.io

-
PKHUD
A Swift based reimplementation of the Apple HUD (Volume, Ringer, Rotation,…) for iOS 8.

-
StatefulViewController
Placeholder views based on content, loading, error or empty states
-
UIColor+Hex, now Swift.
Convenience method for creating autoreleased color using RGBA hex string.
-
AppVersionMonitor
Monitor iOS app version easily.
-
KeyboardObserver
Monitor iOS app version easily.
-
Eureka
Elegant iOS form builder in Swift 2

-
Former
Former is a fully customizable Swift2 library for easy creating UITableView based form.

-
SwiftyUserDefaults 2.0
Statically-typed NSUserDefaults http://radex.io/swift/nsuserdefaults/static
-
SwiftKeychainWrapper
A simple static wrapper for the iOS Keychain to allow you to use it in a similar fashion to user defaults. Written in Swift.
-
CryptoSwift
Crypto related functions and helpers for Swift implemented in Swift programming language http://krzyzanowskim.com
-
Prephirences
Prephirences is a Swift library that provides useful protocols and convenient methods to manage application preferences, configurations and app-state.

-
CryptoPrephirences
Add some encryption to your sensitive preferences
-
Validator
Drop in user input validation for your iOS apps.
-
Gaikan
Declarative view styling in Swift. Inspired by CSS modules.

-
TRON
Lightweight network abstraction layer, written on top of Alamofire

-
BNR Core Data Stack
The Big Nerd Ranch Core Data Stack
-
Duration
A simple Swift package for measuring and reporting the time taken for operations
-
EasyPeasy
Auto Layout made easy

-
Palau
NSUserDefaults with Wings!

Relevant tools
-
SwiftGen
A collection of Swift tools to generate Swift code (enums for your assets, storyboards, Localizable.strings, …)
-
xcres
xcres searches your Xcode project for resources

-
Boa
Boa is a simple Ruby gem to generate VIPER projects and modules
-
Viper Module Generator
Gem to generate VIPER modules to use them in your Objective-C/Swift projects
-
cocoapods-clean
cocoapods plugin. Remove Podfile.lock, Pods/ and *.xcworkspace.
-
ViewMonitor
ViewMonitor can measure view positions with accuracy.

Relevant resources
-
Design Patterns implemented in Swift 2
Design Patterns implemented in Swift
-
Swift Toolbox
Swift toolbox is a community-supported catalog of iOS and OSX libraries written in the Swift Programming Language.

-
cocoacontrols

-
IBM Swift Package Catalog
-
iOS Cookies
A hand curated collection of iOS libraries written in Swift

-
awesome-swift
A curated list of awesome Swift frameworks, libraries and software.
-
awesome-swift
A collaborative list of awesome swift resources. Feel free to contribute!
-
CodePath iOS Guides

-
iOS Good Practices
Good ideas for iOS development, by Futurice developers. http://www.futurice.com

-
Clean Swift
-
Awesome-Swift-Education
All the resources for Learning About Swift
-
Awesome-Apple
An opinionated, curated list of awesome libraries, plugins, and resources for Apple platform development
-
The Official raywenderlich.com Swift Style Guide
The official Swift style guide for raywenderlich.com.
-
ios-architecture
Better ways to structure apps
-
A robust multi-environment build setup
-
Documenting Your Swift Code in Xcode Using Markdown
-
Grok Swift
Bibliography
- ActiveRecord pattern:
- DAO Pattern:
- DTO Pattern:
- Singleton in Swift:
- Swift extensions:
- Testing
- VIPER architecture
- https://mutualmobile.github.io/blog/2013/12/04/viper-introduction/
- https://www.objc.io/issues/13-architecture/viper/
- https://github.com/mutualmobile/VIPER-SWIFT
- http://ppinera.es/2014/11/16/viper-looking-for-the-perfect-architecture.html
- Automatic VIPER modules generation: https://medium.com/@Supercharge/generating-viper-modules-with-boa-e8d9f090966b#.egnqwjp07
Bonus
- iOS Unit Testing: Dependency Injection with Structs in Swift